Introduction
Modern backend systems often require heavy lifting behind the scenes. Tasks like generating monthly reports, sending welcome emails, or syncing large datasets can block the main application thread. Blocking the main thread results in slow response times, timed-out HTTP requests, and a poor user experience. To solve this, developers use background processing to offload work.
However, running background jobs in a distributed microservices environment introduces complexity. If you have three identical instances of your Spring Boot application running, how do you prevent all three instances from executing the same scheduled job at the exact same time? This is where distributed job runners shine.
In this ultimate guide, we will explore JobRunr, an extremely popular and powerful distributed background job scheduling library for Java. We will integrate it with Spring Boot 4, back it with PostgreSQL, and supercharge its performance using Java 25 Virtual Threads.
What is JobRunr and Why Choose It?
JobRunr is a library that allows you to easily enqueue and schedule background jobs in Java applications. Unlike the native Jakarta EE @Asynchronous annotation or standard Spring @Async, JobRunr is designed from the ground up to be distributed and persistent.
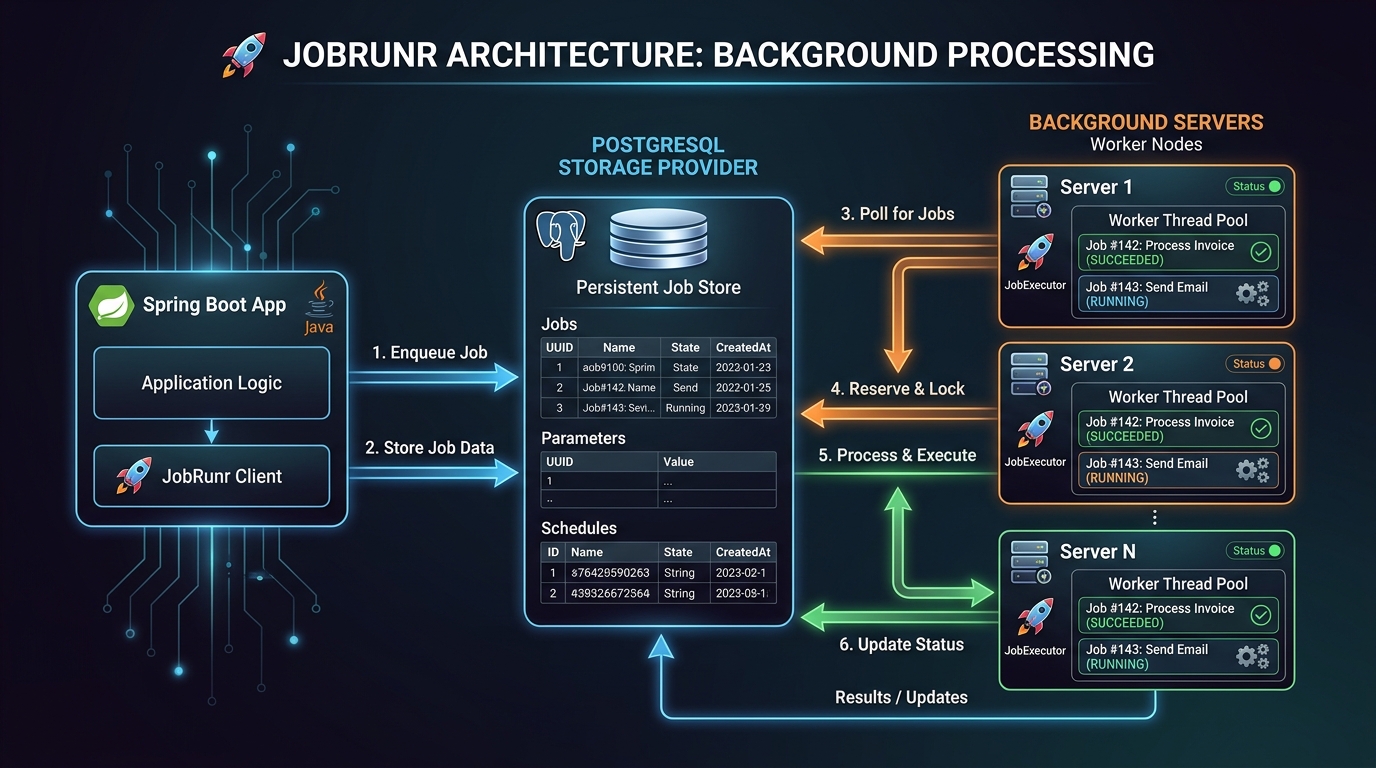
When you enqueue a job using JobRunr, it does not immediately execute it in local memory. Instead, JobRunr serializes the job method and its arguments and saves them to a persistent Storage Provider (like PostgreSQL, MySQL, MongoDB, or Redis). Background servers then poll this storage, acquire an exclusive lock on the job, and execute it.
Key Advantages of JobRunr:
- Distributed by Default: Safe to use in multi-node clusters (e.g., Kubernetes) without executing duplicate jobs.
- Persistent: Jobs survive application crashes and restarts.
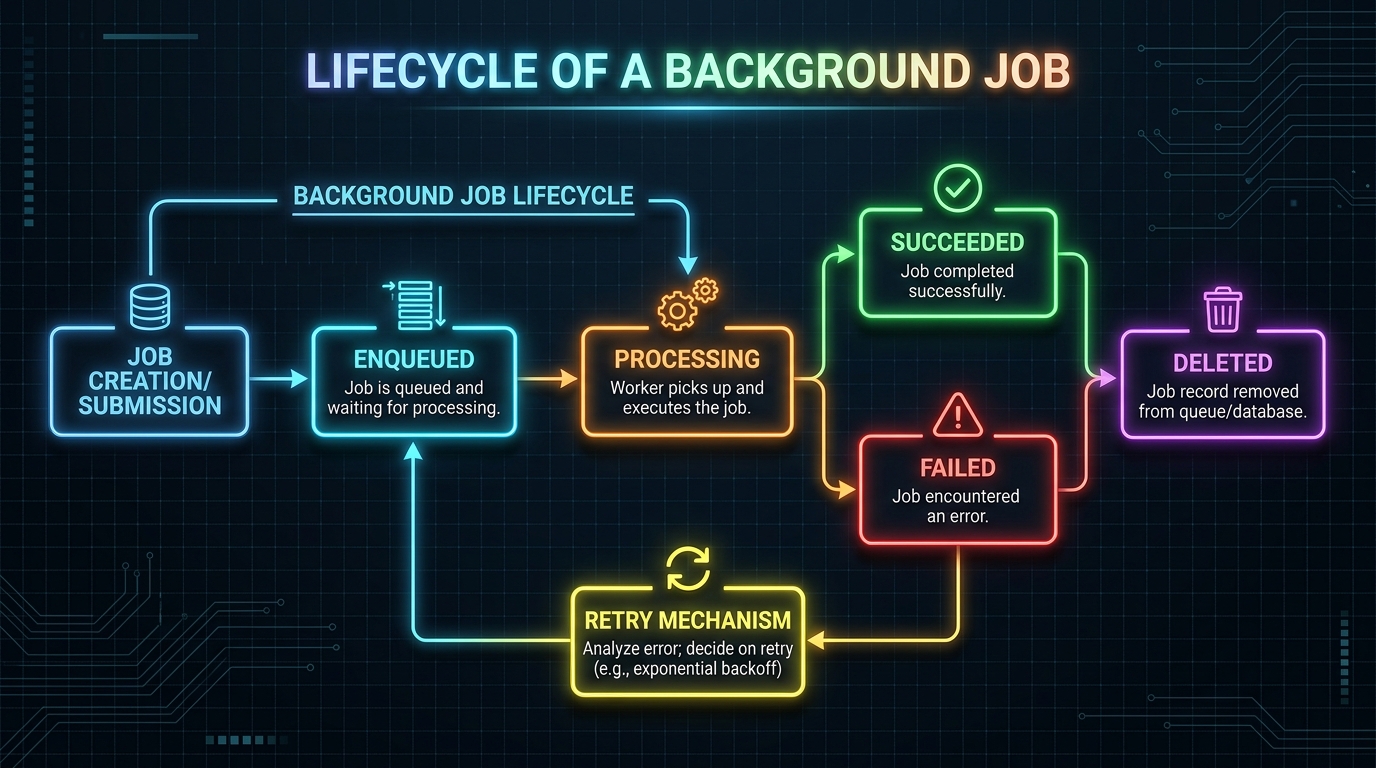
- Built-in Retries: Failed jobs are automatically retried using exponential backoff.
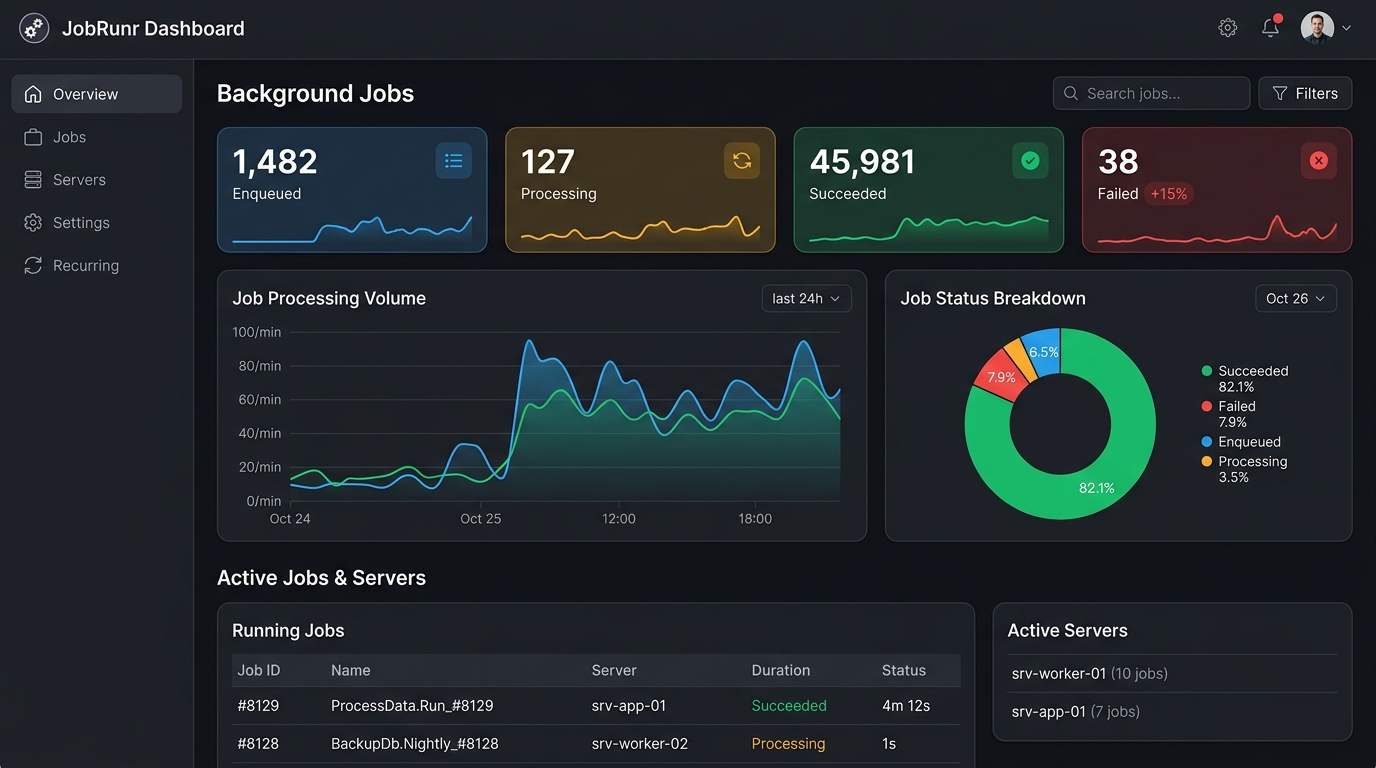
- Dashboard: Provides a beautiful built-in web dashboard to monitor your background processes.
Step 1: Setting up Spring Boot 4 and JobRunr
Let us implement a practical scenario. We will build an application that sends a welcome email immediately after user registration, and schedules a heavy monthly report generation.
First, add the necessary dependencies to your pom.xml. We are using Spring Boot 4, JobRunr, and PostgreSQL.
<dependencies>
    <dependency>
        <groupId>org.springframework.boot</groupId>
        <artifactId>spring-boot-starter-web</artifactId>
    </dependency>
    <dependency>
        <groupId>org.springframework.boot</groupId>
        <artifactId>spring-boot-starter-data-jpa</artifactId>
    </dependency>
    <dependency>
        <groupId>org.jobrunr</groupId>
        <artifactId>jobrunr-spring-boot-3-starter</artifactId>
        <version>7.3.2</version>
    </dependency>
    <dependency>
        <groupId>org.postgresql</groupId>
        <artifactId>postgresql</artifactId>
        <scope>runtime</scope>
    </dependency>
</dependencies>
Note: The jobrunr-spring-boot-3-starter remains compatible with the early Spring Boot 4 ecosystem, automatically autowiring the JobScheduler beans.
Step 2: Configuration and Virtual Threads
In your application.properties, we will configure the PostgreSQL connection, enable the built-in JobRunr dashboard, and most importantly, enable Java 25 Virtual Threads.
Virtual Threads (Project Loom) are lightweight threads managed by the JVM rather than the operating system. They allow you to run thousands of concurrent blocking operations (like database queries or external API calls) with minimal memory overhead. This makes them the perfect match for background job runners executing massive volumes of I/O-bound tasks.

# application.properties

# 1. Enable Java 25 Virtual Threads globally
spring.threads.virtual.enabled=true

# 2. JobRunr Configuration
org.jobrunr.background-job-server.enabled=true
org.jobrunr.dashboard.enabled=true
org.jobrunr.dashboard.port=8000

# 3. PostgreSQL Database Connection
spring.datasource.url=jdbc:postgresql://localhost:5432/jobrunrdb
spring.datasource.username=postgres
spring.datasource.password=postgres
spring.datasource.driver-class-name=org.postgresql.Driver
Step 3: Creating Background Jobs
Now, let us create the business logic. We will define an EmailService. You can use the @Job annotation to customize the job name displayed in the dashboard and specify custom retry logic for fragile operations.
package com.webcodein.jobrunr.service;

import org.jobrunr.jobs.annotations.Job;
import org.slf4j.Logger;
import org.slf4j.LoggerFactory;
import org.springframework.stereotype.Service;

@Service
public class EmailService {

    private static final Logger log = LoggerFactory.getLogger(EmailService.class);

    @Job(name = "Send welcome email to %0")
    public void sendWelcomeEmail(String email) {
        log.info("Sending welcome email to {}...", email);
        try {
            // Simulate heavy lifting using Virtual Threads
            Thread.sleep(1000);
        } catch (InterruptedException e) {
            Thread.currentThread().interrupt();
        }
        log.info("Welcome email sent to {}", email);
    }

    @Job(name = "Generate monthly report", retries = 2)
    public void generateMonthlyReport() {
        log.info("Generating monthly report...");
        try {
            Thread.sleep(3000);
        } catch (InterruptedException e) {
            Thread.currentThread().interrupt();
        }
        log.info("Monthly report generated successfully.");
    }
}
Step 4: Enqueueing Jobs via REST API
To actually trigger these jobs, inject the JobScheduler into your REST Controller. You pass a standard Java lambda expression to the scheduler. JobRunr uses advanced bytecode manipulation to serialize this lambda and store it in PostgreSQL.
package com.webcodein.jobrunr.controller;

import com.webcodein.jobrunr.service.EmailService;
import org.jobrunr.scheduling.JobScheduler;
import org.springframework.http.ResponseEntity;
import org.springframework.web.bind.annotation.PostMapping;
import org.springframework.web.bind.annotation.RequestMapping;
import org.springframework.web.bind.annotation.RequestParam;
import org.springframework.web.bind.annotation.RestController;

import java.time.Duration;
import java.time.Instant;

@RestController
@RequestMapping("/api/jobs")
public class JobController {

    private final JobScheduler jobScheduler;
    private final EmailService emailService;

    public JobController(JobScheduler jobScheduler, EmailService emailService) {
        this.jobScheduler = jobScheduler;
        this.emailService = emailService;
    }

    @PostMapping("/enqueue")
    public ResponseEntity<String> enqueueJob(@RequestParam String email) {
        // Enqueue a Fire-and-forget job
        jobScheduler.enqueue(() -> emailService.sendWelcomeEmail(email));
        return ResponseEntity.ok("Job enqueued successfully");
    }

    @PostMapping("/schedule")
    public ResponseEntity<String> scheduleJob() {
        // Schedule a Delayed job
        jobScheduler.schedule(Instant.now().plus(Duration.ofMinutes(1)), () -> emailService.generateMonthlyReport());
        return ResponseEntity.ok("Report scheduled in 1 minute");
    }
}
Monitoring with the JobRunr Dashboard
Because we set org.jobrunr.dashboard.enabled=true, JobRunr starts an embedded web interface on port 8000. This dashboard is an incredible tool for operations. You can monitor the number of succeeded and failed jobs, inspect stack traces of errors, and manually requeue or delete jobs without touching the database.
Common Mistakes to Avoid
- Passing complex entities to jobs: Because JobRunr serializes job parameters to the database as JSON, you should never pass massive JPA entities or un-serializable objects inside the lambda expression. Always pass simple primitives like a
userIdand let the job load the entity from the database itself. - Modifying lambda method signatures: If you enqueue a job and then rename the target method or change its parameters in the source code before the job runs, JobRunr will throw an exception because the stored signature no longer matches the running code.
Conclusion
JobRunr is an exceptional choice for modern enterprise applications that require resilient, distributed background processing. By combining it with Spring Boot 4 and Java 25 Virtual Threads, you can build systems capable of chewing through massive workloads reliably and transparently.
If you want to read more about advanced architectural patterns, check out our guide on Practical Domain-Driven Design.
Companion Workshop Code
You can find the complete, runnable Spring Boot 4 source code for this tutorial, along with the Testcontainers setup and Docker Compose files, on our official GitHub repository:
Download the code from the WebCodein Workshop Repository