
Introduction
Modern enterprise applications run in distributed cloud environments. In these environments, failure is not an exception; it is an everyday reality. Networks experience packet loss, microservices encounter latency spikes, cloud providers suffer transient outages, and database connections drop without warning. If your software assumes the network is always fast, reliable, and available, a single temporary network blip can trigger a cascading outage across your entire enterprise architecture.
Traditionally, developers tested system reliability by writing unit tests with mock objects or running manual failover drills in staging environments. However, mocks cannot reproduce real-world network behavior, such as TCP connection timeouts, packet reordering, or slow response streams. This is why software engineering teams practice Chaos Engineering: the discipline of intentionally injecting realistic faults into running systems to build confidence in their resilience.
In this step-by-step tutorial, you will master chaos engineering in the Java ecosystem. Using Spring Boot 4, Java 25, and Testcontainers, we will integrate Toxiproxy—a battle-tested TCP proxy built by Shopify—directly into our automated integration test suite. We will simulate catastrophic network disruptions between our application and a PostgreSQL 16 database, and verify that our system gracefully recovers using Spring Retry and defensive fallback mechanisms.
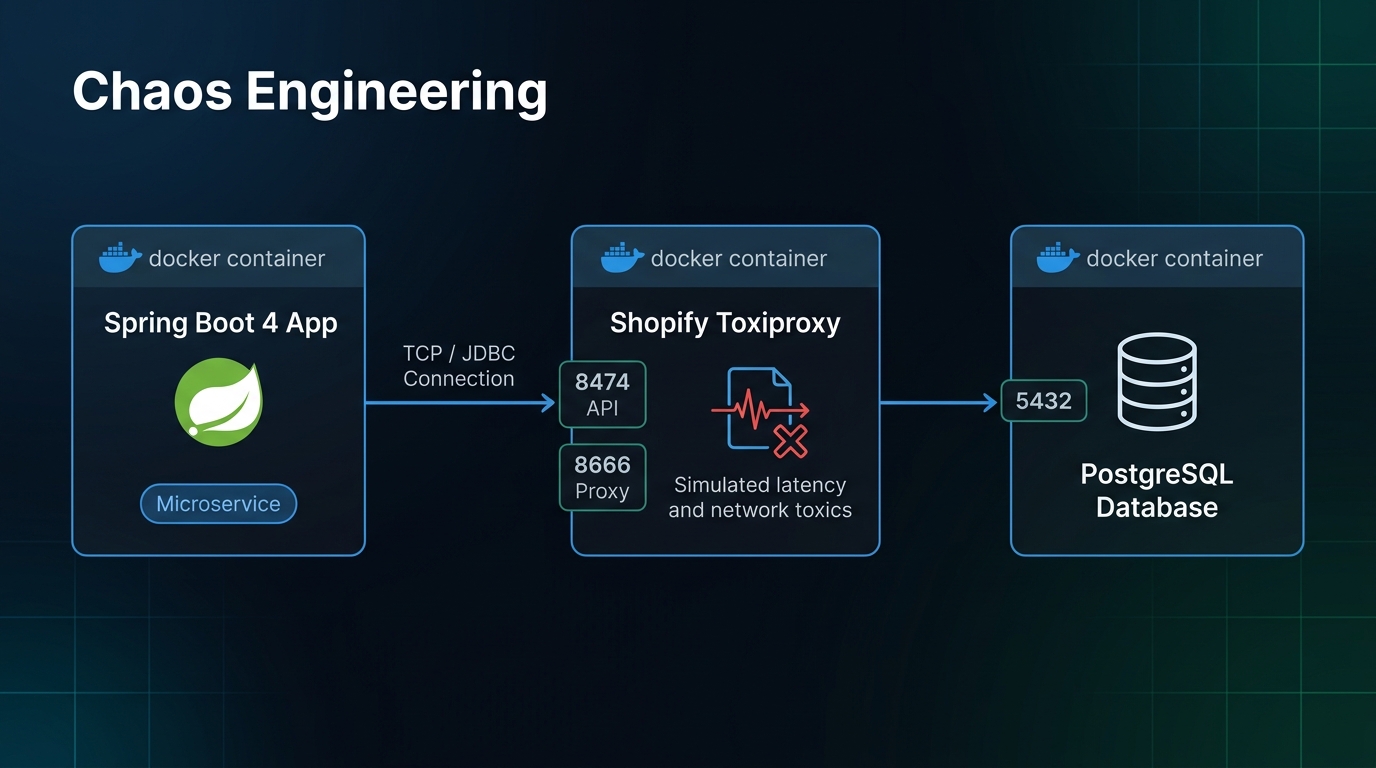
What You Will Build
In this tutorial, we will build a resilient retail Order Management Service. The service exposes a REST API endpoint for placing customer orders and persists transaction records into a PostgreSQL database.
Instead of connecting directly to PostgreSQL during integration testing, we route our JDBC traffic through a Toxiproxy container running on a shared Docker bridge network. We will configure an automated chaos test suite that executes the following scenario:
- Verify normal order creation when the network proxy is healthy and operating at full speed.
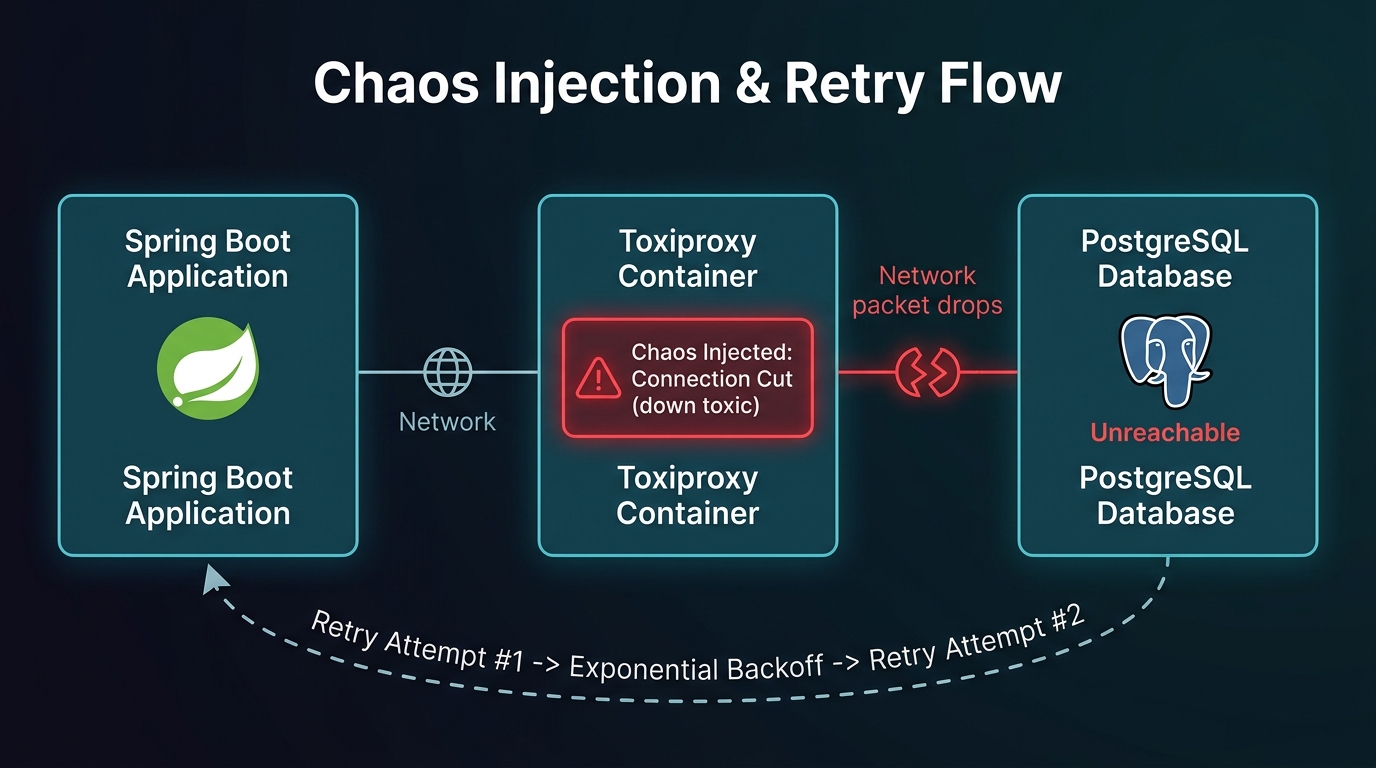
- Inject a severe downstream bandwidth toxic that cuts the network connection between Spring Boot and PostgreSQL to zero bytes per second.
- Verify that Spring Retry automatically intercepts the connection failure and retries the persistence operation using an exponential backoff strategy.
- Verify that after exhausting all retry attempts, Spring invokes a designated
@Recoverfallback handler. - Verify that the REST API returns a clean, degraded HTTP 503 Service Unavailable response with descriptive error metadata, rather than crashing with an unhandled 500 Internal Server Error.
- Remove the toxic condition and confirm that subsequent transactions recover automatically without requiring an application restart.
Core Concepts of Chaos Engineering and Toxiproxy
Before writing code, let us review the architectural mechanics of chaos engineering and understand why Toxiproxy is uniquely effective for testing Java applications.
1. Principles of Chaos Engineering
Chaos engineering is not about randomly breaking production servers. It follows a structured, scientific methodology:
- Define Steady State: First, establish a measurable definition of normal system behavior. In our order service, steady state means HTTP
POST /api/ordersreturns HTTP 200 OK and saves the order in the database within 50 milliseconds. - Hypothesize Resilience: Formulate a testable hypothesis. For example: “If the database connection drops temporarily, the service will retry up to three times and return a degraded status rather than crashing.”
- Inject Realistic Real-World Variables: Introduce simulated real-world failures, such as server crashes, latency spikes, or dropped network packets.
- Verify and Disprove: Compare the measured behavior against your hypothesis. If the system fails unexpectedly (such as thread exhaustion or data corruption), you uncover an architectural weakness before it causes a real production outage.
2. How Toxiproxy Works
Toxiproxy is a Layer 4 (TCP) proxy designed specifically for testing resilience under degraded network conditions. It operates as an intermediary between your client application (Spring Boot) and your upstream service (such as PostgreSQL, Redis, Kafka, or an external REST API).
Toxiproxy exposes two separate network interfaces:
- Proxy Ports: The active traffic forwarding ports. When Spring Boot sends JDBC queries to port
8666on Toxiproxy, Toxiproxy forwards those packets over TCP to PostgreSQL on port5432. - Control API: An HTTP REST API (typically running on port
8474). During automated tests, your test code uses a Java client library (toxiproxy-java) to dynamically inject, adjust, or remove network anomalies on the fly without restarting the proxy.
3. Types of Network Toxics
Toxiproxy simulates real-world network anomalies through entities called toxics. You can apply toxics in the DOWNSTREAM direction (packets traveling from the upstream database to your application) or in the UPSTREAM direction (packets sent from your application to the database):
- Latency: Adds an artificial delay (in milliseconds) to every packet, simulating high-latency wide-area network (WAN) connections or cross-region cloud traffic. You can also add jitter to simulate network variance.
- Bandwidth: Limits total throughput to a specified rate in kilobytes per second. Setting bandwidth to
0simulates a total cable cut or severe network partition. - Slow Close: Delays sending the TCP FIN packet when closing a socket, simulating half-open connections and hanging sockets.
- Timeout: Halts all packet transmission for a specified duration before closing the connection, testing whether client timeouts trigger as expected.
- Slicer: Slices TCP packets into small chunks and introduces delays between them, simulating packet fragmentation and poor wireless networks.
Prerequisites and Environment Setup
To follow this tutorial, ensure your local development workstation meets the following requirements:
- Java Development Kit (JDK): Version 25 (or LTS versions 21+).
- Apache Maven: Version 3.9 or higher (or use the included Maven wrapper
./mvnw). - Docker Engine: Docker Desktop on Windows/macOS or Docker Engine on Linux must be installed and running. Testcontainers requires a working Docker daemon to start the PostgreSQL and Toxiproxy containers.
- Command Line Tools:
curlor a REST client (such as Postman or HTTPie) for testing the local HTTP endpoints.
Step 1: Configure Maven Dependencies
Create a new Spring Boot 4 application. Open your pom.xml file and configure the necessary dependencies for web, data persistence, retry automation, and testing.
<?xml version="1.0" encoding="UTF-8"?>
<project xmlns="http://maven.apache.org/POM/4.0.0" xmlns:xsi="http://www.w3.org/2001/XMLSchema-instance"
         xsi:schemaLocation="http://maven.apache.org/POM/4.0.0 https://maven.apache.org/xsd/maven-4.0.0.xsd">
    <modelVersion>4.0.0</modelVersion>

    <parent>
        <groupId>org.springframework.boot</groupId>
        <artifactId>spring-boot-starter-parent</artifactId>
        <version>4.0.0</version>
        <relativePath/>
    </parent>

    <groupId>com.webcodein.workshop</groupId>
    <artifactId>chaos-engineering-toxiproxy</artifactId>
    <version>0.0.1-SNAPSHOT</version>
    <name>chaos-engineering-toxiproxy</name>
    <description>Chaos Engineering Demo with Spring Boot 4, Testcontainers, and Toxiproxy</description>

    <properties>
        <java.version>25</java.version>
    </properties>

    <dependencies>
        <!-- Spring Boot Web Starter -->
        <dependency>
            <groupId>org.springframework.boot</groupId>
            <artifactId>spring-boot-starter-web</artifactId>
        </dependency>

        <!-- Spring Data JPA for Database Persistence -->
        <dependency>
            <groupId>org.springframework.boot</groupId>
            <artifactId>spring-boot-starter-data-jpa</artifactId>
        </dependency>

        <!-- Spring Retry for Declarative Resilience -->
        <dependency>
            <groupId>org.springframework.retry</groupId>
            <artifactId>spring-retry</artifactId>
            <version>2.0.10</version>
        </dependency>

        <!-- PostgreSQL JDBC Driver -->
        <dependency>
            <groupId>org.postgresql</groupId>
            <artifactId>postgresql</artifactId>
            <scope>runtime</scope>
        </dependency>

        <!-- Test Dependencies -->
        <dependency>
            <groupId>org.springframework.boot</groupId>
            <artifactId>spring-boot-starter-test</artifactId>
            <scope>test</scope>
        </dependency>
        <dependency>
            <groupId>org.springframework.boot</groupId>
            <artifactId>spring-boot-testcontainers</artifactId>
            <scope>test</scope>
        </dependency>
        <dependency>
            <groupId>org.testcontainers</groupId>
            <artifactId>testcontainers-junit-jupiter</artifactId>
            <scope>test</scope>
        </dependency>
        <dependency>
            <groupId>org.testcontainers</groupId>
            <artifactId>testcontainers-postgresql</artifactId>
            <scope>test</scope>
        </dependency>
        <dependency>
            <groupId>org.testcontainers</groupId>
            <artifactId>toxiproxy</artifactId>
            <version>1.20.1</version>
            <scope>test</scope>
        </dependency>
    </dependencies>

    <build>
        <plugins>
            <plugin>
                <groupId>org.springframework.boot</groupId>
                <artifactId>spring-boot-maven-plugin</artifactId>
            </plugin>
        </plugins>
    </build>
</project>
Step 2: Enable Retry in the Application
By default, Spring Boot does not activate retry processing until you explicitly enable it. Open your primary application entrypoint class, ChaosApplication.java, and annotate it with @EnableRetry.
The @EnableRetry annotation instructs Spring’s BeanPostProcessor to detect any Spring bean methods annotated with @Retryable and wrap them with dynamic AOP interceptors that handle method re-execution.
package com.webcodein.workshop.chaos;

import org.springframework.boot.SpringApplication;
import org.springframework.boot.autoconfigure.SpringBootApplication;
import org.springframework.retry.annotation.EnableRetry;

@SpringBootApplication
@EnableRetry
public class ChaosApplication {

    public static void main(String[] args) {
        SpringApplication.run(ChaosApplication.class, args);
    }
}
Step 3: Define the Order Domain Model and Repository
Next, define the data persistence model. We create an Order JPA entity representing retail purchase transactions. Notice how we track the processing lifecycle using a status string column.
package com.webcodein.workshop.chaos;

import jakarta.persistence.Entity;
import jakarta.persistence.GeneratedValue;
import jakarta.persistence.GenerationType;
import jakarta.persistence.Id;
import jakarta.persistence.Table;

@Entity
@Table(name = "orders")
public class Order {

    @Id
    @GeneratedValue(strategy = GenerationType.IDENTITY)
    private Long id;

    private String product;
    private int quantity;
    private String status;

    public Order() {}

    public Order(String product, int quantity, String status) {
        this.product = product;
        this.quantity = quantity;
        this.status = status;
    }

    public Long getId() {
        return id;
    }

    public String getProduct() {
        return product;
    }

    public int getQuantity() {
        return quantity;
    }

    public String getStatus() {
        return status;
    }

    public void setStatus(String status) {
        this.status = status;
    }
}
Now create a standard Spring Data JPA repository interface extending JpaRepository. Spring Data generates the underlying SQL statements at runtime.
package com.webcodein.workshop.chaos;

import org.springframework.data.jpa.repository.JpaRepository;
import org.springframework.stereotype.Repository;

@Repository
public interface OrderRepository extends JpaRepository<Order, Long> {
}
Step 4: Implement the Resilient Retryable Service
Now we implement the core business logic in OrderService.java. This service encapsulates our database persistence logic and configures our resilience policies using @Retryable and @Recover.
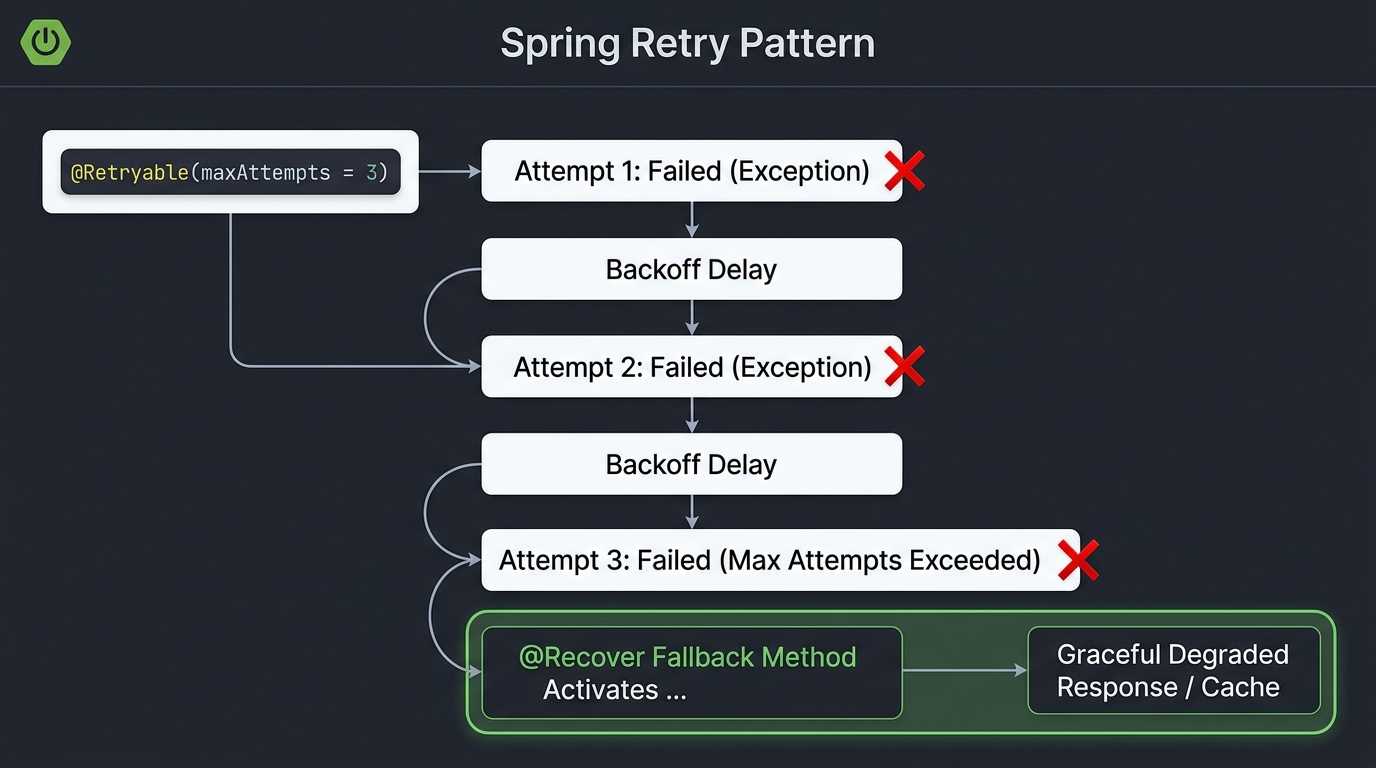
Examine the configuration of @Retryable:
retryFor = {Exception.class}: Specifies the exceptions that trigger a retry. In production, you can target specific exceptions likeJDBCConnectionExceptionorSocketTimeoutException.maxAttempts = 3: The total number of attempts (1 initial attempt plus 2 retries) before declaring failure.backoff = @Backoff(delay = 1000, multiplier = 2): An exponential backoff policy. The first retry waits 1,000 milliseconds (1 second). The second retry waits 2,000 milliseconds (2 seconds). This exponential increase allows downstream services time to recover without being overwhelmed by immediate connection storms.
package com.webcodein.workshop.chaos;

import org.slf4j.Logger;
import org.slf4j.LoggerFactory;
import org.springframework.retry.annotation.Backoff;
import org.springframework.retry.annotation.Recover;
import org.springframework.retry.annotation.Retryable;
import org.springframework.stereotype.Service;

@Service
public class OrderService {

    private static final Logger log = LoggerFactory.getLogger(OrderService.class);
    private final OrderRepository orderRepository;

    public OrderService(OrderRepository orderRepository) {
        this.orderRepository = orderRepository;
    }

    @Retryable(
            retryFor = {Exception.class},
            maxAttempts = 3,
            backoff = @Backoff(delay = 1000, multiplier = 2)
    )
    public Order placeOrder(String product, int quantity) {
        log.info("Attempting to place order for {} (Quantity: {})", product, quantity);
        Order order = new Order(product, quantity, "PENDING");
        return orderRepository.save(order);
    }

    @Recover
    public Order fallbackPlaceOrder(Exception e, String product, int quantity) {
        log.error("All retry attempts failed. Order creation for {} aborted due to network disruption: {}",
                product, e.getMessage());
        return new Order(product, quantity, "FAILED_NETWORK_ISSUE");
    }
}
Step 5: Expose the REST Controller
Now build the web controller layer in OrderController.java. The controller accepts incoming HTTP POST requests, delegates to OrderService, and translates the domain status into appropriate HTTP response status codes.
package com.webcodein.workshop.chaos;

import org.springframework.http.ResponseEntity;
import org.springframework.web.bind.annotation.PostMapping;
import org.springframework.web.bind.annotation.RequestMapping;
import org.springframework.web.bind.annotation.RequestParam;
import org.springframework.web.bind.annotation.RestController;

@RestController
@RequestMapping("/api/orders")
public class OrderController {

    private final OrderService orderService;

    public OrderController(OrderService orderService) {
        this.orderService = orderService;
    }

    @PostMapping
    public ResponseEntity<Order> createOrder(@RequestParam String product, @RequestParam int quantity) {
        Order order = orderService.placeOrder(product, quantity);

        // If the fallback handler caught a network failure, return HTTP 503 Service Unavailable
        if ("FAILED_NETWORK_ISSUE".equals(order.getStatus())) {
            return ResponseEntity.status(503).body(order);
        }

        return ResponseEntity.ok(order);
    }
}
Also create a standard application.properties file in src/main/resources/ for local runtime configuration outside of tests:
spring.application.name=chaos-engineering-toxiproxy
spring.datasource.url=jdbc:postgresql://localhost:5432/chaos
spring.datasource.username=postgres
spring.datasource.password=postgres
spring.jpa.hibernate.ddl-auto=update
Step 6: Author the Chaos Engineering Integration Test
This is the centerpiece of the tutorial. We author an automated integration test that orchestrates Docker containers, configures dynamic networking, and injects controlled chaos using Toxiproxy.
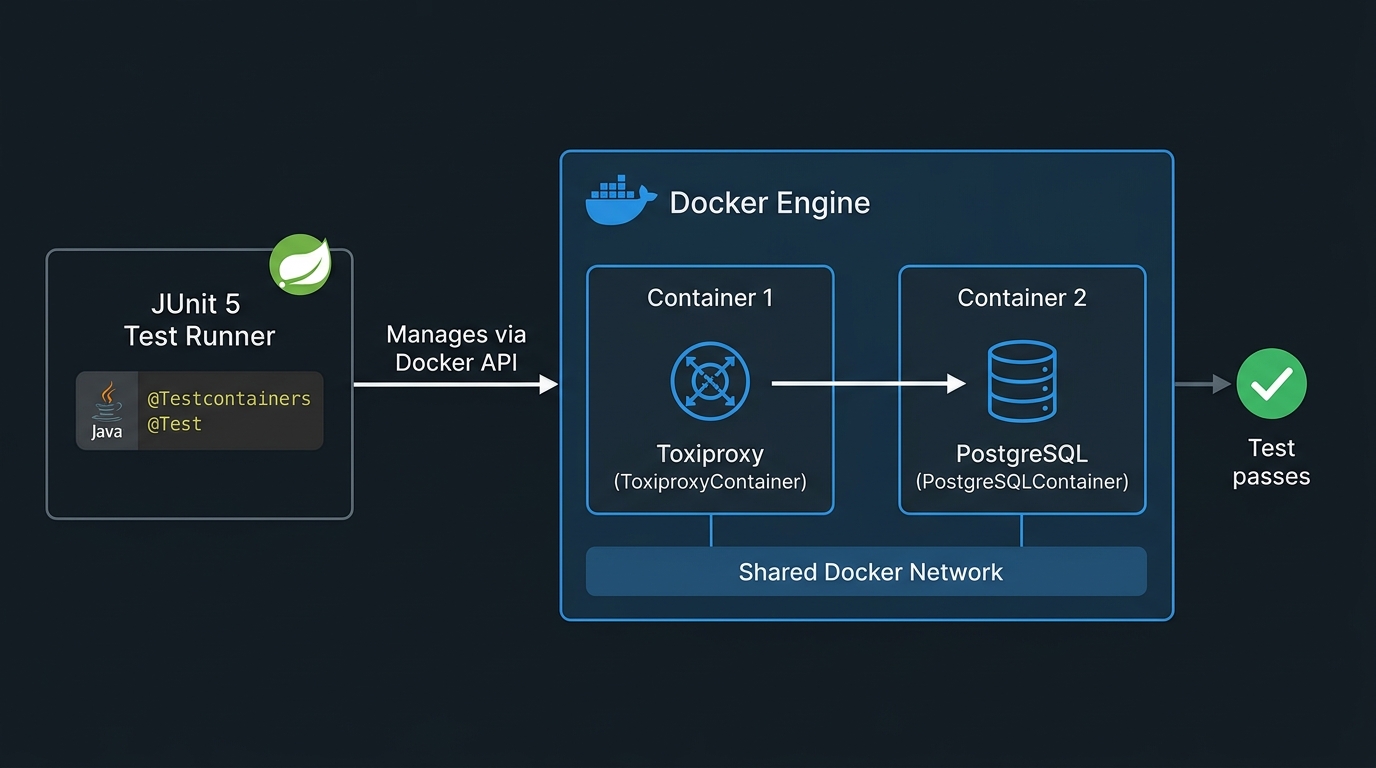
Test Orchestration Mechanics
Notice the critical architecture patterns used in our test:
- Shared Network (
Network.newNetwork()): Both the PostgreSQL container and the Toxiproxy container join the same internal Docker network. This allows Toxiproxy to address PostgreSQL via its internal DNS aliaspostgres:5432. - Dynamic Property Injection (
@DynamicPropertySource): We do not connect Spring Boot directly to PostgreSQL’s mapped port. Instead, we callclient.createProxy("postgresql", "0.0.0.0:8666", "postgres:5432")to create a dynamic proxy mapping. Then we setspring.datasource.urlto Toxiproxy’s host and mapped port. - JDBC Socket Timeout (
socketTimeout=2): We append?socketTimeout=2(2 seconds) to the JDBC URL. When Toxiproxy cuts bandwidth to zero, TCP packets are silently dropped. Without an explicit socket timeout, the underlying PostgreSQL JDBC driver would block indefinitely waiting for an operating system TCP keepalive timeout (which can take minutes). The 2-second timeout guarantees fast failure and triggers Spring Retry promptly.
package com.webcodein.workshop.chaos;

import eu.rekawek.toxiproxy.Proxy;
import eu.rekawek.toxiproxy.ToxiproxyClient;
import eu.rekawek.toxiproxy.model.ToxicDirection;
import org.junit.jupiter.api.Test;
import org.slf4j.Logger;
import org.slf4j.LoggerFactory;
import org.springframework.beans.factory.annotation.Autowired;
import org.springframework.boot.test.autoconfigure.web.servlet.AutoConfigureMockMvc;
import org.springframework.boot.test.context.SpringBootTest;
import org.springframework.test.context.DynamicPropertyRegistry;
import org.springframework.test.context.DynamicPropertySource;
import org.springframework.test.web.servlet.MockMvc;
import org.testcontainers.containers.Network;
import org.testcontainers.containers.PostgreSQLContainer;
import org.testcontainers.containers.ToxiproxyContainer;
import org.testcontainers.junit.jupiter.Container;
import org.testcontainers.junit.jupiter.Testcontainers;

import static org.springframework.test.web.servlet.request.MockMvcRequestBuilders.post;
import static org.springframework.test.web.servlet.result.MockMvcResultMatchers.jsonPath;
import static org.springframework.test.web.servlet.result.MockMvcResultMatchers.status;

@SpringBootTest
@AutoConfigureMockMvc
@Testcontainers
public class ChaosEngineeringIntegrationTest {

    private static final Logger log = LoggerFactory.getLogger(ChaosEngineeringIntegrationTest.class);
    private static final Network network = Network.newNetwork();

    @Container
    public static PostgreSQLContainer<?> postgres = new PostgreSQLContainer<>("postgres:16-alpine")
            .withNetwork(network)
            .withNetworkAliases("postgres");

    @Container
    public static ToxiproxyContainer toxiproxy = new ToxiproxyContainer("ghcr.io/shopify/toxiproxy:2.9.0")
            .withNetwork(network);

    private static Proxy proxy;

    @DynamicPropertySource
    static void configureProperties(DynamicPropertyRegistry registry) throws Exception {
        ToxiproxyClient client = new ToxiproxyClient(toxiproxy.getHost(), toxiproxy.getControlPort());
        proxy = client.createProxy("postgresql", "0.0.0.0:8666", "postgres:5432");

        // Route JDBC traffic through the Toxiproxy mapped port with a 2-second socket timeout
        String proxyUrl = "jdbc:postgresql://" + toxiproxy.getHost() + ":" + toxiproxy.getMappedPort(8666)
                + "/" + postgres.getDatabaseName() + "?socketTimeout=2";

        registry.add("spring.datasource.url", () -> proxyUrl);
        registry.add("spring.datasource.username", postgres::getUsername);
        registry.add("spring.datasource.password", postgres::getPassword);
    }

    @Autowired
    private MockMvc mockMvc;

    @Test
    void shouldSuccessfullyPlaceOrderWhenDatabaseIsHealthy() throws Exception {
        // Step 1: Normal steady-state verification
        mockMvc.perform(post("/api/orders")
                        .param("product", "MacBook Pro")
                        .param("quantity", "1"))
                .andExpect(status().isOk())
                .andExpect(jsonPath("$.status").value("PENDING"));
    }

    @Test
    void shouldRecoverAndFailWhenDatabaseLatencyIsTooHigh() throws Exception {
        // Step 2: Inject chaos - cut all downstream bandwidth to simulate network drop
        proxy.toxics().bandwidth("cut-connection", ToxicDirection.DOWNSTREAM, 0);

        try {
            // Step 3: Invoke the API and verify graceful degradation to HTTP 503
            mockMvc.perform(post("/api/orders")
                            .param("product", "iPhone 15")
                            .param("quantity", "2"))
                    .andExpect(status().isServiceUnavailable())
                    .andExpect(jsonPath("$.status").value("FAILED_NETWORK_ISSUE"));
        } finally {
            // Step 4: Always clean up toxics in a finally block so subsequent tests run clean
            proxy.toxics().get("cut-connection").remove();
        }
    }
}
Step 7: Execute and Verify the Chaos Test Suite
Now execute the test suite using the Maven wrapper. Testcontainers will automatically download the official Docker images, configure internal network bridges, and execute the test cases against PostgreSQL and Toxiproxy.
./mvnw clean verifyDuring the execution of shouldRecoverAndFailWhenDatabaseLatencyIsTooHigh, inspect your terminal logs. You will see Spring Retry repeatedly attempting to execute the method:
INFO  c.w.w.chaos.OrderService : Attempting to place order for iPhone 15 (Quantity: 2)
INFO  c.w.w.chaos.OrderService : Attempting to place order for iPhone 15 (Quantity: 2)
INFO  c.w.w.chaos.OrderService : Attempting to place order for iPhone 15 (Quantity: 2)
ERROR c.w.w.chaos.OrderService : All retry attempts failed. Order creation for iPhone 15 aborted due to network disruption.
Both test cases pass with BUILD SUCCESS. This confirms that your application handles severe network partitions predictably, preserves system resources, and returns clean, actionable status responses to clients.
Architectural Comparison: Spring Retry vs Resilience4j
When engineering resilience into Spring Boot microservices, teams often evaluate between lightweight declarative retries (Spring Retry) and full-featured fault tolerance suites (Resilience4j). Below is an architectural trade-off analysis.
| Resilience Feature | Spring Retry | Resilience4j |
|---|---|---|
| Primary Focus | Declarative method-level retries and recover fallbacks | Complete fault tolerance toolkit (circuit breaker, rate limiter, bulkhead) |
| Circuit Breaker State Machine | Basic circuit breaker available via @CircuitBreaker |
Advanced state machine (CLOSED, OPEN, HALF_OPEN) with sliding window metrics |
| Configuration Model | Annotations on service methods (@Retryable) |
Externalized configuration in application.yml or functional decorators |
| Observability Integration | Basic logging listeners and retry listeners | Native Micrometer metrics, Prometheus endpoints, and Actuator health indicators |
| Overhead & Complexity | Minimal (single lightweight starter) | Moderate (additional modular starters and configuration) |
| Ideal Use Case | Transient database glitch recovery and simple HTTP retries | High-throughput inter-service microservice meshes and external partner APIs |
Production Best Practices for Chaos Engineering
To maximize the reliability of your resilience testing in enterprise continuous integration (CI) environments, follow these industry best practices:
- Always Enforce Socket Timeouts: Never rely solely on default operating system TCP timeouts. Always configure explicit
socketTimeoutparameters on JDBC connection strings and HTTP client connection pools. If traffic is cut abruptly, a socket without a timeout can block worker threads indefinitely, leading to thread pool exhaustion. - Ensure Idempotency for Retried Operations: Only retry operations that are naturally idempotent (such as HTTP GET, PUT, and DELETE) or operations protected by unique idempotency keys. Retrying a non-idempotent operation (such as credit card payment processing) without unique transaction tokens can result in duplicate customer charges.
- Add Random Jitter to Exponential Backoff: When dozens of instances encounter a network partition simultaneously, having them retry on fixed intervals creates a “thundering herd” problem that overloads the recovering database. Always add randomized jitter (for example,
@Backoff(delay = 1000, multiplier = 2, random = true)) to stagger retry spikes. - Always Clean Up Toxics in Finally Blocks: When testing with Toxiproxy, always remove injected toxics inside a
finallyblock or an@AfterEachteardown method. If an assertion fails before a toxic is removed, subsequent tests in the same test suite will fail unexpectedly due to residual network degradation. - Automate Chaos in CI/CD Pipelines: Integrate Toxiproxy tests directly into your GitHub Actions or Jenkins CI pipelines. Catching resilience regressions automatically during pull request builds prevents fragile deployment bugs from ever reaching staging or production clusters.
Common Pitfalls and How to Fix Them
Pitfall 1: Integration Test Hangs Indefinitely When Connection Is Cut
Symptom: When Toxiproxy sets bandwidth to 0, the test runner hangs forever and eventually times out after 10 or 15 minutes.
Root Cause: The PostgreSQL JDBC driver defaults to an infinite socket timeout. When packets are silently dropped without a TCP RST packet, the socket waits indefinitely for the OS keepalive timer.
Fix: Append ?socketTimeout=2 (or 3) to the JDBC URL in your dynamic property configuration. This instructs the JDBC socket to throw a SocketTimeoutException after 2 seconds of inactivity.
Pitfall 2: ‘Cannot find recover method’ Exception
Symptom: Spring Retry throws an error stating that no suitable recover method could be found for @Recover.
Root Cause: The @Recover method must have the exact same return type as the @Retryable method. Furthermore, its first parameter must be the exception type (or a superclass), followed by parameters that match the @Retryable method arguments in the exact same order.
Fix: Ensure your method signatures match:
// @Retryable method
public Order placeOrder(String product, int quantity)

// Corresponding @Recover method
@Recover
public Order fallbackPlaceOrder(Exception e, String product, int quantity)
Pitfall 3: HikariCP Connection Pool Starvation
Symptom: During network disruption tests, HikariCP logs Connection is not available, request timed out after 30000ms.
Root Cause: Pooled connections remain occupied while waiting on dead sockets. If multiple threads retry simultaneously, all connections in the pool are consumed.
Fix: In your test configuration, configure a low Hikari connection timeout (such as spring.datasource.hikari.connection-timeout=3000) and enable validation queries to purge broken connections promptly.
Summary and Key Takeaways
Chaos engineering empowers software teams to verify application resilience through automated, repeatable testing rather than guessing how systems will behave during real cloud outages:
- Real-World Network Simulation: Toxiproxy provides programmatic control over Layer 4 TCP traffic, allowing you to simulate latency, dropped connections, and jitter on demand.
- Frictionless Testcontainers Orchestration: Running Toxiproxy and PostgreSQL inside Docker containers on a shared bridge network enables reproducible integration tests across any developer workstation or CI pipeline.
- Declarative Fault Recovery: Spring Retry provides clean, annotation-driven retries with exponential backoff and graceful recovery fallbacks, keeping business logic clean and maintainable.
- Defensive Operational Readiness: Combining socket timeouts with randomized backoff protects database connection pools and prevents cascading failures across distributed microservices.
Frequently Asked Questions
What network faults can Toxiproxy simulate besides cutting bandwidth?
Toxiproxy supports a wide variety of network toxics. These include latency (adding artificial round-trip delay with optional jitter), timeout (stopping data transmission for a duration before dropping the connection), slicer (splitting packets into small fragments with random delays), and slow close (delaying TCP FIN packets to simulate half-closed connections). You can chain multiple toxics together to simulate complex cloud network degradation.
How does Spring Retry differ from full resilience libraries like Resilience4j?
Spring Retry focuses primarily on method-level retries and fallback recovery using Spring AOP proxies. It is lightweight and requires minimal configuration. Resilience4j is a complete fault tolerance framework providing stateful circuit breakers, rate limiters, bulkheads, and rich Micrometer metrics. For simple database retry logic, Spring Retry is ideal; for large distributed microservice meshes with high traffic volumes, Resilience4j offers greater control and observability.
Why is an explicit socket timeout mandatory when testing with Toxiproxy?
When Toxiproxy injects a bandwidth cut or network partition, it drops TCP packets silently without sending a TCP RESET (RST) packet. If the client JDBC driver does not have an explicit socketTimeout configured, the operating system socket will block indefinitely until its TCP keepalive timer expires (which can take minutes or hours). Configuring a 2-second socket timeout ensures the JDBC driver fails quickly, triggering Spring Retry within acceptable test timeframes.
How can we run Toxiproxy chaos tests reliably in continuous integration (CI) pipelines?
Because Testcontainers automatically manages container lifecycles and allocates dynamic ephemeral host ports for mapped containers, tests avoid port binding conflicts entirely. In GitHub Actions or Jenkins CI runners, ensure the runner has access to the Docker daemon. The tests run completely isolated in containerized networks, ensuring deterministic, reproducible build results without impacting other CI jobs.
Companion Workshop Code
The complete, runnable companion code for this tutorial—including the Spring Boot 4 service, PostgreSQL Docker configuration, Toxiproxy integration tests, and Maven wrapper—is available on GitHub:
Get the Chaos Engineering Spring Boot 4 Code on GitHub