
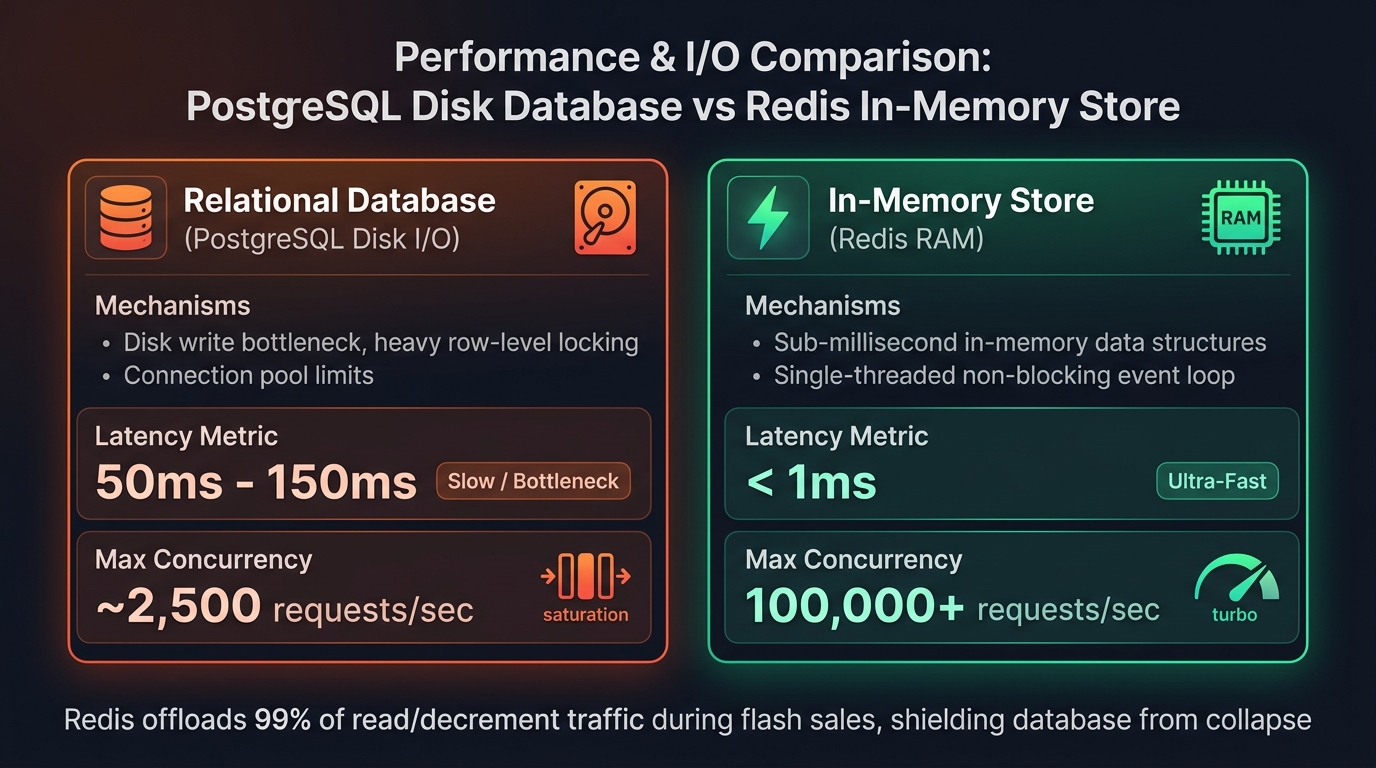
Flash sales on mobile apps are extremely popular. However, they bring a big technical challenge. When thousands of users tap the “Buy” button at the exact same second, your backend can easily crash or oversell inventory. If you only have 100 phones, you cannot sell 101. Standard databases like PostgreSQL struggle to lock rows fast enough under such heavy concurrent load.
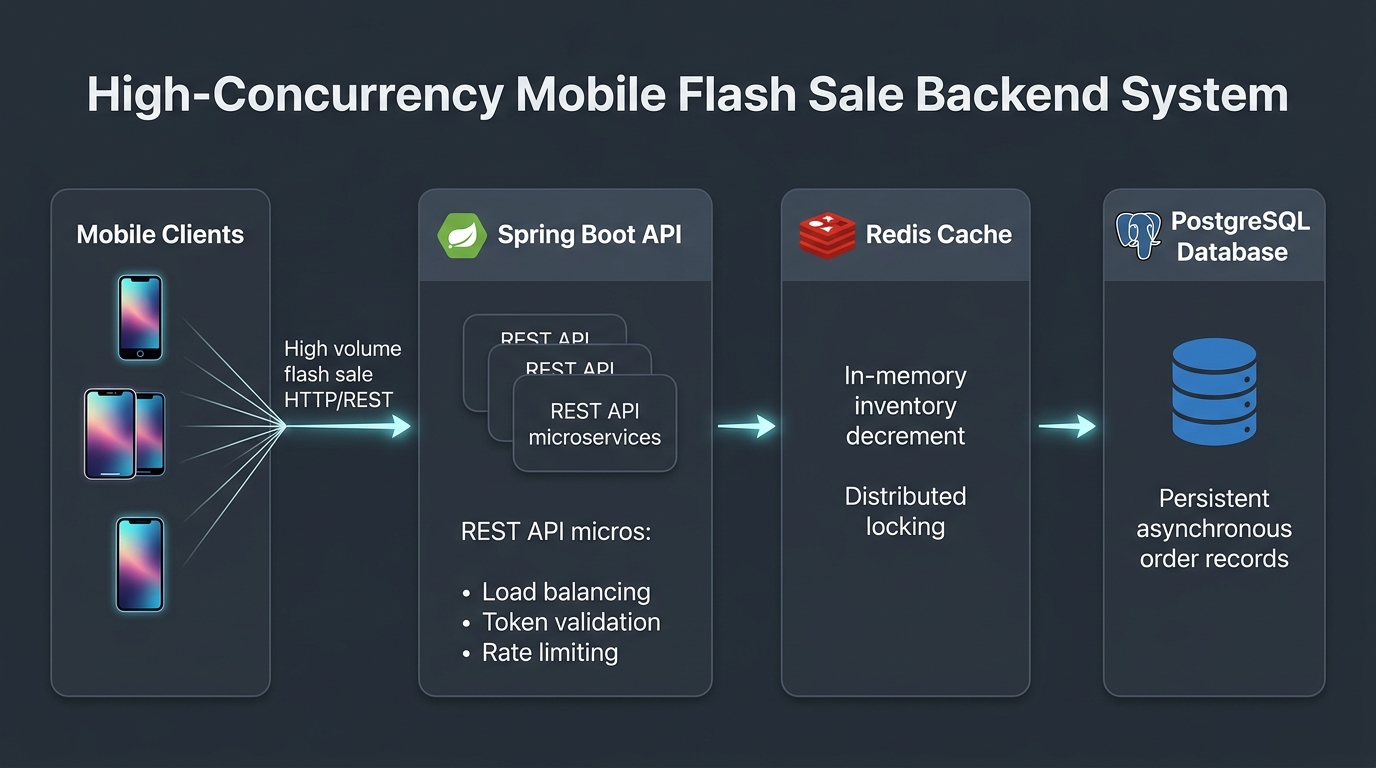
In this step-by-step tutorial, you will learn how to build a high-concurrency mobile flash sale backend. We will use Spring Boot 4, Java 25, and Redis. You will see how to use a Redis Lua script to instantly lock and decrement inventory. Then, we will process the actual order asynchronously in PostgreSQL.
What You’ll Build
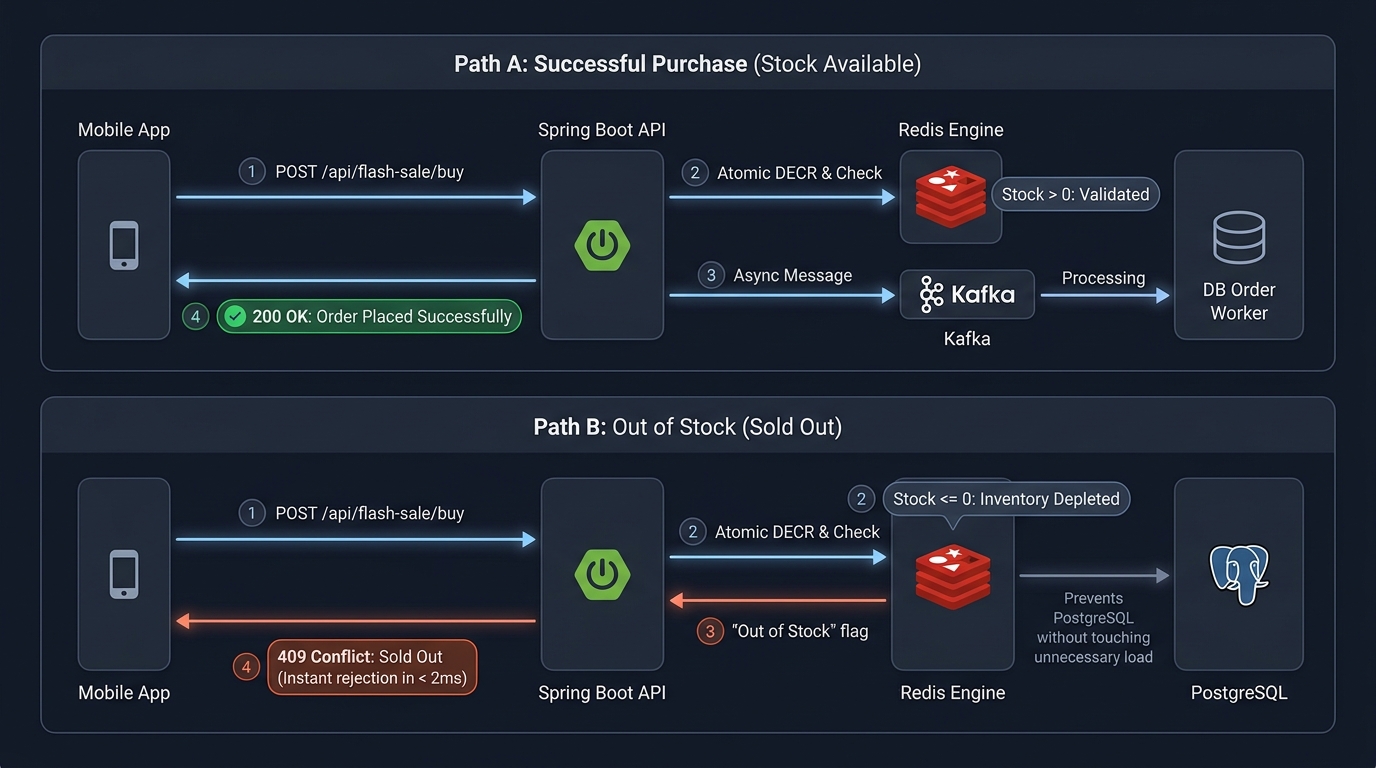
You will build a Spring Boot 4 REST API that handles purchase requests. The system will use Redis to track inventory in memory. A Lua script will guarantee that no two users can buy the same item at the same time. After Redis confirms the stock, the system will save the final order into PostgreSQL.
Prerequisites
- Java 25 (or newer) installed on your machine.
- Maven 3.9+ for building the project.
- Docker running (for Testcontainers and our local database setup).
- Basic knowledge of Spring Boot and REST APIs.
Step 1: Create the Spring Boot 4 Project
First, we need to set up our Maven project. We will include dependencies for Spring Web, Spring Data Redis, Spring Data JPA, and Testcontainers. Testcontainers will automatically start Redis and PostgreSQL when we run our tests.
Create a file named pom.xml in your new project folder:
<?xml version="1.0" encoding="UTF-8"?>
<project xmlns="http://maven.apache.org/POM/4.0.0" xmlns:xsi="http://www.w3.org/2001/XMLSchema-instance"
         xsi:schemaLocation="http://maven.apache.org/POM/4.0.0 https://maven.apache.org/xsd/maven-4.0.0.xsd">
    <modelVersion>4.0.0</modelVersion>
    <parent>
        <groupId>org.springframework.boot</groupId>
        <artifactId>spring-boot-starter-parent</artifactId>
        <version>4.0.0</version>
    </parent>
    <groupId>com.webcodein.architecture</groupId>
    <artifactId>high-concurrency-mobile-flash-sale-spring-boot-redis</artifactId>
    <version>1.0.0-SNAPSHOT</version>

    <properties>
        <java.version>25</java.version>
    </properties>

    <dependencies>
        <dependency>
            <groupId>org.springframework.boot</groupId>
            <artifactId>spring-boot-starter-web</artifactId>
        </dependency>
        <dependency>
            <groupId>org.springframework.boot</groupId>
            <artifactId>spring-boot-starter-data-jpa</artifactId>
        </dependency>
        <dependency>
            <groupId>org.springframework.boot</groupId>
            <artifactId>spring-boot-starter-data-redis</artifactId>
        </dependency>
        <dependency>
            <groupId>org.postgresql</groupId>
            <artifactId>postgresql</artifactId>
            <scope>runtime</scope>
        </dependency>
        <dependency>
            <groupId>org.springframework.boot</groupId>
            <artifactId>spring-boot-starter-test</artifactId>
            <scope>test</scope>
        </dependency>
        <dependency>
            <groupId>org.testcontainers</groupId>
            <artifactId>testcontainers-junit-jupiter</artifactId>
            <scope>test</scope>
        </dependency>
        <dependency>
            <groupId>org.testcontainers</groupId>
            <artifactId>testcontainers-postgresql</artifactId>
            <scope>test</scope>
        </dependency>
        <dependency>
            <groupId>org.springframework.boot</groupId>
            <artifactId>spring-boot-testcontainers</artifactId>
            <scope>test</scope>
        </dependency>
    </dependencies>

    <build>
        <plugins>
            <plugin>
                <groupId>org.springframework.boot</groupId>
                <artifactId>spring-boot-maven-plugin</artifactId>
            </plugin>
        </plugins>
    </build>
</project>
Code walkthrough:
- We declare
spring-boot-starter-webto create REST endpoints. - We declare
spring-boot-starter-data-redisto connect to our Redis instance. - We add Testcontainers dependencies so we can write integration tests without installing databases locally.
Step 2: Create the Application Entry Point
Every Spring Boot application needs a main class. We will also enable asynchronous processing because we want to save orders in the background.
Create src/main/java/com/webcodein/architecture/flashsale/FlashSaleApplication.java:
package com.webcodein.architecture.flashsale;

import org.springframework.boot.SpringApplication;
import org.springframework.boot.autoconfigure.SpringBootApplication;
import org.springframework.scheduling.annotation.EnableAsync;

@SpringBootApplication
@EnableAsync
public class FlashSaleApplication {
    public static void main(String[] args) {
        SpringApplication.run(FlashSaleApplication.class, args);
    }
}
The @EnableAsync annotation allows us to run methods in separate background threads later.
Step 3: Define the Order Domain
When a user successfully buys an item, we need to record the order in our PostgreSQL database. Let’s create a simple JPA Entity and a Repository to manage it.
Create src/main/java/com/webcodein/architecture/flashsale/domain/Order.java:
package com.webcodein.architecture.flashsale.domain;

import jakarta.persistence.Entity;
import jakarta.persistence.GeneratedValue;
import jakarta.persistence.GenerationType;
import jakarta.persistence.Id;
import jakarta.persistence.Table;

@Entity
@Table(name = "orders")
public class Order {
    @Id
    @GeneratedValue(strategy = GenerationType.IDENTITY)
    private Long id;
    private String productId;
    private String userId;

    public Order() {}

    public Order(String productId, String userId) {
        this.productId = productId;
        this.userId = userId;
    }

    public Long getId() { return id; }
    public String getProductId() { return productId; }
    public String getUserId() { return userId; }
}
Next, create the repository interface at src/main/java/com/webcodein/architecture/flashsale/domain/OrderRepository.java:
package com.webcodein.architecture.flashsale.domain;

import org.springframework.data.jpa.repository.JpaRepository;

public interface OrderRepository extends JpaRepository<Order, Long> {
}
We also need to tell Hibernate to automatically create our database tables. Add this to src/main/resources/application.yml:
spring:
  jpa:
    hibernate:
      ddl-auto: update
Step 4: Create the Redis Lua Script
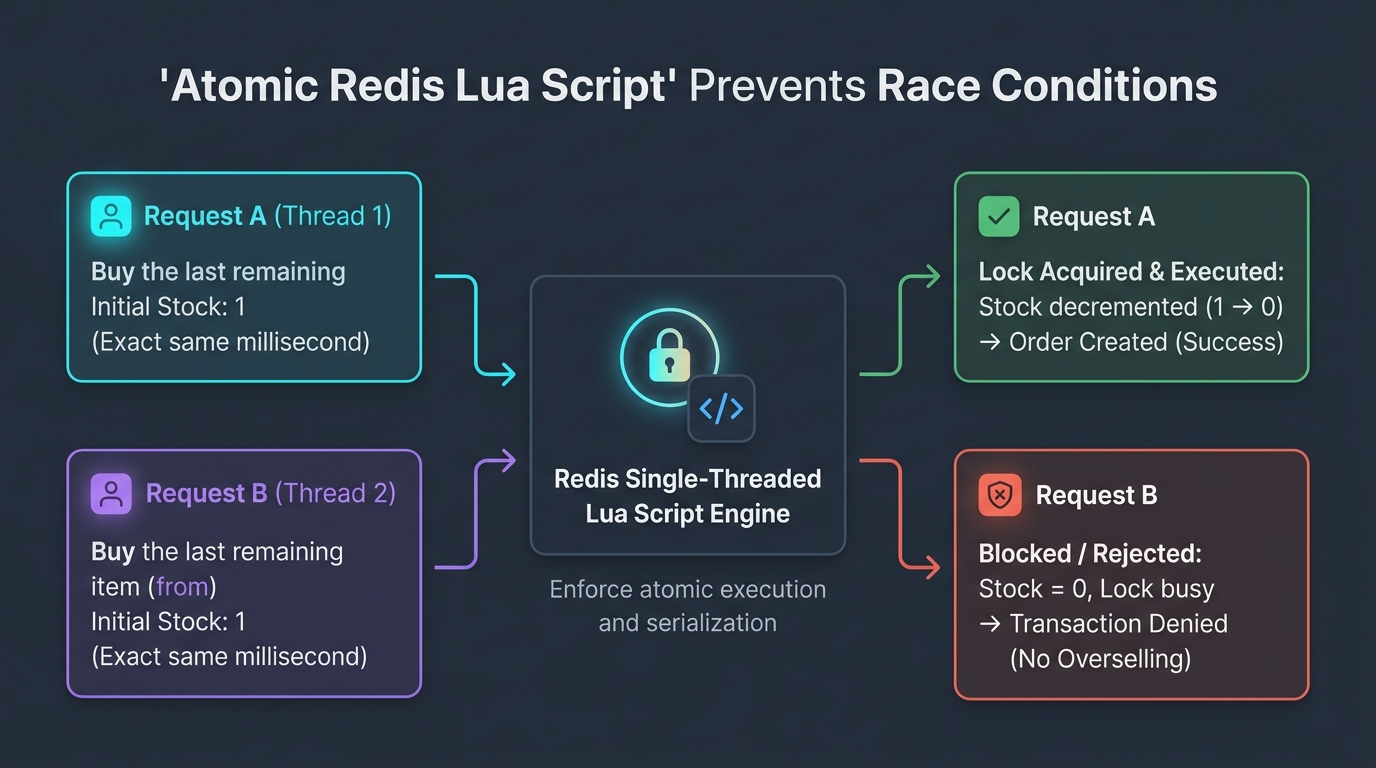
This is the most critical part of the flash sale. A standard “read, check, update” process in Java will fail under high concurrency. If two threads read the inventory as “1” at the same time, they will both subtract 1, and the inventory will go below zero (overselling).
Redis evaluates Lua scripts atomically. This means no other command can run while the script is executing.
Create src/main/resources/scripts/decrement_inventory.lua:
local inventory_key = KEYS[1]
local requested_quantity = tonumber(ARGV[1])

local current_inventory = tonumber(redis.call('get', inventory_key) or "0")

if current_inventory >= requested_quantity then
    redis.call('decrby', inventory_key, requested_quantity)
    return 1 -- Success
else
    return 0 -- Failed, out of stock
end
Now, let’s configure Spring Boot to load this script. Create src/main/java/com/webcodein/architecture/flashsale/config/RedisConfig.java:
package com.webcodein.architecture.flashsale.config;

import org.springframework.context.annotation.Bean;
import org.springframework.context.annotation.Configuration;
import org.springframework.core.io.ClassPathResource;
import org.springframework.data.redis.core.script.DefaultRedisScript;
import org.springframework.data.redis.core.script.RedisScript;

@Configuration
public class RedisConfig {
    @Bean
    public RedisScript<Long> decrementInventoryScript() {
        DefaultRedisScript<Long> script = new DefaultRedisScript<>();
        script.setLocation(new ClassPathResource("scripts/decrement_inventory.lua"));
        script.setResultType(Long.class);
        return script;
    }
}
Step 5: Process the Order Asynchronously
After Redis confirms the purchase, we should not make the user wait while we write to PostgreSQL. Writing to a relational database is slow compared to Redis.
Create an async service at src/main/java/com/webcodein/architecture/flashsale/service/OrderProcessor.java:
package com.webcodein.architecture.flashsale.service;

import com.webcodein.architecture.flashsale.domain.Order;
import com.webcodein.architecture.flashsale.domain.OrderRepository;
import org.springframework.scheduling.annotation.Async;
import org.springframework.stereotype.Service;

@Service
public class OrderProcessor {
    private final OrderRepository orderRepository;

    public OrderProcessor(OrderRepository orderRepository) {
        this.orderRepository = orderRepository;
    }

    @Async
    public void processOrder(String productId, String userId) {
        // We simulate a small processing delay
        try {
            Thread.sleep(50);
        } catch (InterruptedException e) {
            Thread.currentThread().interrupt();
        }
        orderRepository.save(new Order(productId, userId));
    }
}
Step 6: Build the Flash Sale Service
Now we connect Redis and the order processor. We execute the Lua script, and if it returns `1`, we know the inventory was successfully decremented.
Create src/main/java/com/webcodein/architecture/flashsale/service/FlashSaleService.java:
package com.webcodein.architecture.flashsale.service;

import org.springframework.data.redis.core.StringRedisTemplate;
import org.springframework.data.redis.core.script.RedisScript;
import org.springframework.stereotype.Service;
import java.util.List;

@Service
public class FlashSaleService {
    private final StringRedisTemplate redisTemplate;
    private final RedisScript<Long> decrementInventoryScript;
    private final OrderProcessor orderProcessor;

    public FlashSaleService(StringRedisTemplate redisTemplate, RedisScript<Long> decrementInventoryScript, OrderProcessor orderProcessor) {
        this.redisTemplate = redisTemplate;
        this.decrementInventoryScript = decrementInventoryScript;
        this.orderProcessor = orderProcessor;
    }

    public boolean purchase(String productId, String userId) {
        String inventoryKey = "inventory:" + productId;

        Long result = redisTemplate.execute(
            decrementInventoryScript,
            List.of(inventoryKey),
            "1"
        );

        if (result != null && result == 1L) {
            orderProcessor.processOrder(productId, userId);
            return true;
        }

        return false;
    }
}
Step 7: Expose the REST Endpoint
Finally, we need a controller so mobile apps can send purchase requests.
Create src/main/java/com/webcodein/architecture/flashsale/controller/FlashSaleController.java:
package com.webcodein.architecture.flashsale.controller;

import com.webcodein.architecture.flashsale.service.FlashSaleService;
import org.springframework.http.ResponseEntity;
import org.springframework.web.bind.annotation.*;

@RestController
@RequestMapping("/api/flash-sale")
public class FlashSaleController {
    private final FlashSaleService flashSaleService;

    public FlashSaleController(FlashSaleService flashSaleService) {
        this.flashSaleService = flashSaleService;
    }

    @PostMapping("/{productId}/purchase")
    public ResponseEntity<String> purchase(@PathVariable String productId, @RequestParam String userId) {
        boolean success = flashSaleService.purchase(productId, userId);
        if (success) {
            return ResponseEntity.ok("Purchase successful! Order is being processed.");
        } else {
            return ResponseEntity.badRequest().body("Sold out!");
        }
    }
}
Testing the Application
To prove our system prevents overselling, we will write an integration test. We will simulate 100 concurrent users trying to buy an item that only has a stock of 10.
Check the companion repository linked below to view the full FlashSaleIntegrationTest.java file. Run the test with Maven:
mvn clean verifyYou will see that exactly 10 requests succeed, and 90 requests fail. No overselling occurs, and 10 orders are asynchronously saved to the database.
Running with Docker
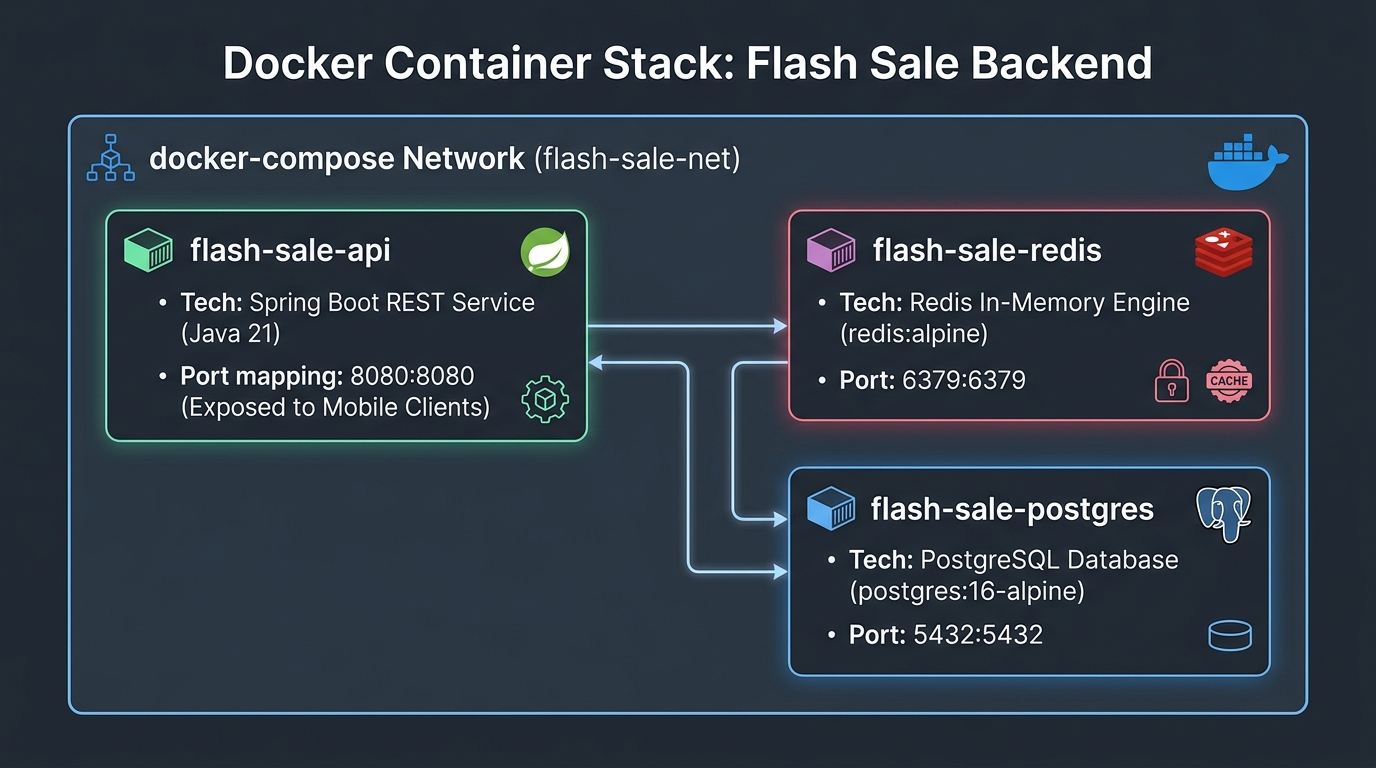
The companion code includes a Dockerfile and a docker-compose.yml file. You can start the entire stack (Postgres, Redis, and Spring Boot) with one command:
docker compose up --buildThen, simulate a purchase in your terminal:
curl -X POST "http://localhost:8080/api/flash-sale/IPHONE15/purchase?userId=user123"What You Learned
- How to execute atomic Lua scripts in Redis to prevent data race conditions.
- How to separate fast in-memory checks from slower database writes.
- How to process background tasks asynchronously in Spring Boot.
- How to orchestrate complex services using Testcontainers for reliable integration testing.
Next Steps
Explore related high-throughput and distributed systems tutorials on WebCodein:
- Managing OTA Canary Rollouts for Millions of Devices using Spring Boot 4 and Redis — Discover how Redis bitmaps efficiently track device cohorts.
- Implementing the Transactional Outbox Pattern with Spring Boot 4, Kafka, and Debezium — Guarantee consistency between database state and event messaging.
- Building Highly Reliable & Idempotent Webhook Consumers in Spring Boot 4 — Ensure zero duplicate side effects across payment and external webhook processing.
- Distributed Background Job Processing with JobRunr and Spring Boot 4 — Offload long-running tasks reliably.
- Integration Testing Spring Boot 4 with Testcontainers and Docker Compose — Test complex multi-container dependencies.
Companion Code
The complete, runnable Spring Boot 4 project for this tutorial, including automated high-concurrency integration tests with Testcontainers, Redis, and PostgreSQL, is available on our public GitHub repository:
Workshop Companion Code: Building a High-Concurrency Mobile Flash Sale Backend with Spring Boot 4 and Redis