
Every software engineer knows how to install an application, but what happens when you need to replace the entire operating system of a device? Flashing a phone—writing a new firmware image directly to the device’s internal storage—is a delicate process. It requires specialized protocols and low-level software architectures to prevent rendering the device completely unusable (bricking).
In this architecture guide, we will dive deep into the software lifecycle of a mobile device. We will explore how bootloaders hand off control, how the Fastboot protocol communicates with the host computer over USB, how dynamic partitions organize flash memory, and how modern A/B partition layouts ensure seamless over-the-air (OTA) updates. If you build cloud delivery services for firmware fleets, see our guide on Building an OTA Firmware Delivery Server in Spring Boot 4.
The Core Components of Android Flashing
To understand how a phone is flashed, you first need to understand the trio of low-level software components that govern the device before the main Android OS even loads. Each layer runs at a different privilege level and performs specific security checks.
1. The Bootloader
The bootloader is the very first piece of code that runs when you power on your device. Its primary job is to initialize essential hardware (RAM, CPU, display) and decide what to boot next. By default, the bootloader verifies the cryptographic signature of the Android OS kernel (a process known as Verified Boot). If the signature is valid, it loads the OS into memory.
If you want to flash a custom ROM or a modified system image, you must first unlock the bootloader. Unlocking disables strict signature checks for custom operating systems. However, for security reasons, unlocking the bootloader immediately triggers a factory reset to erase all user data. This prevents thieves from flashing modified kernels to read private encryption keys.
2. The Recovery Mode
Recovery is a lightweight, independent mini-operating system living on its own dedicated storage partition. It is entirely isolated from the main Android OS. The standard Android Recovery allows users to perform factory resets or apply official signed OTA update packages (update.zip) directly from an SD card or via ADB sideload.
Custom recoveries, such as TWRP (Team Win Recovery Project), replace the stock recovery image. They provide full filesystem access, allowing engineers to create full Nandroid block backups, format specific storage partitions, and flash unsigned firmware packages directly on the device without needing a host computer.
3. Fastboot Protocol
Fastboot is both an open communication protocol and a command-line tool. It connects a host computer to a device over USB while the device is in bootloader mode. Unlike the Android Debug Bridge (ADB), which communicates with the running Android user space, Fastboot talks directly to the bootloader.
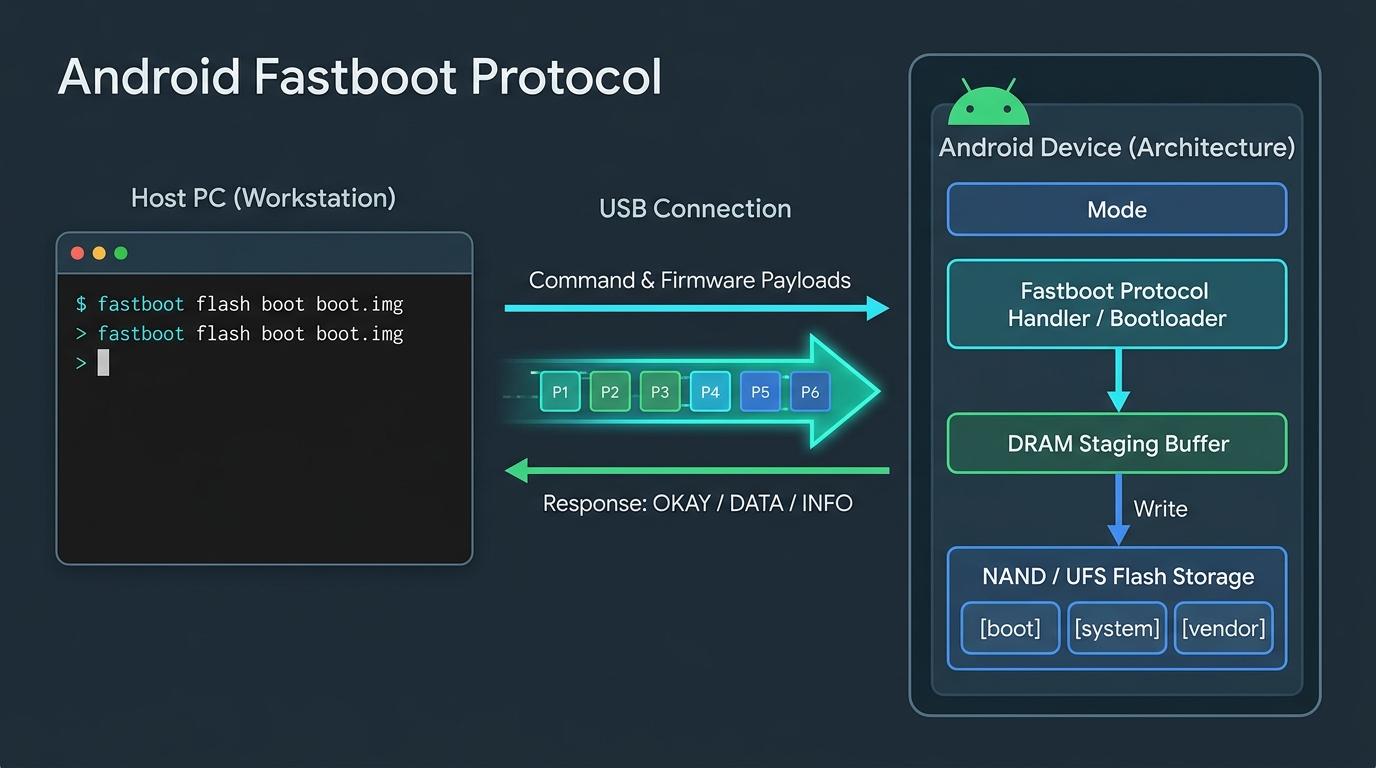
When you execute a command like fastboot flash system system.img, the host computer sends the image file in chunks across the USB connection into the device’s RAM. Once the transfer completes, the bootloader writes the data from RAM directly to physical flash memory blocks mapped to the target partition.
The Cryptographic Boot Chain of Trust
Modern mobile platforms protect against malware and persistent rootkits by executing a strictly ordered cryptographic verification chain from cold boot. Each stage must verify the digital signature and integrity of the next stage before handing over CPU execution.
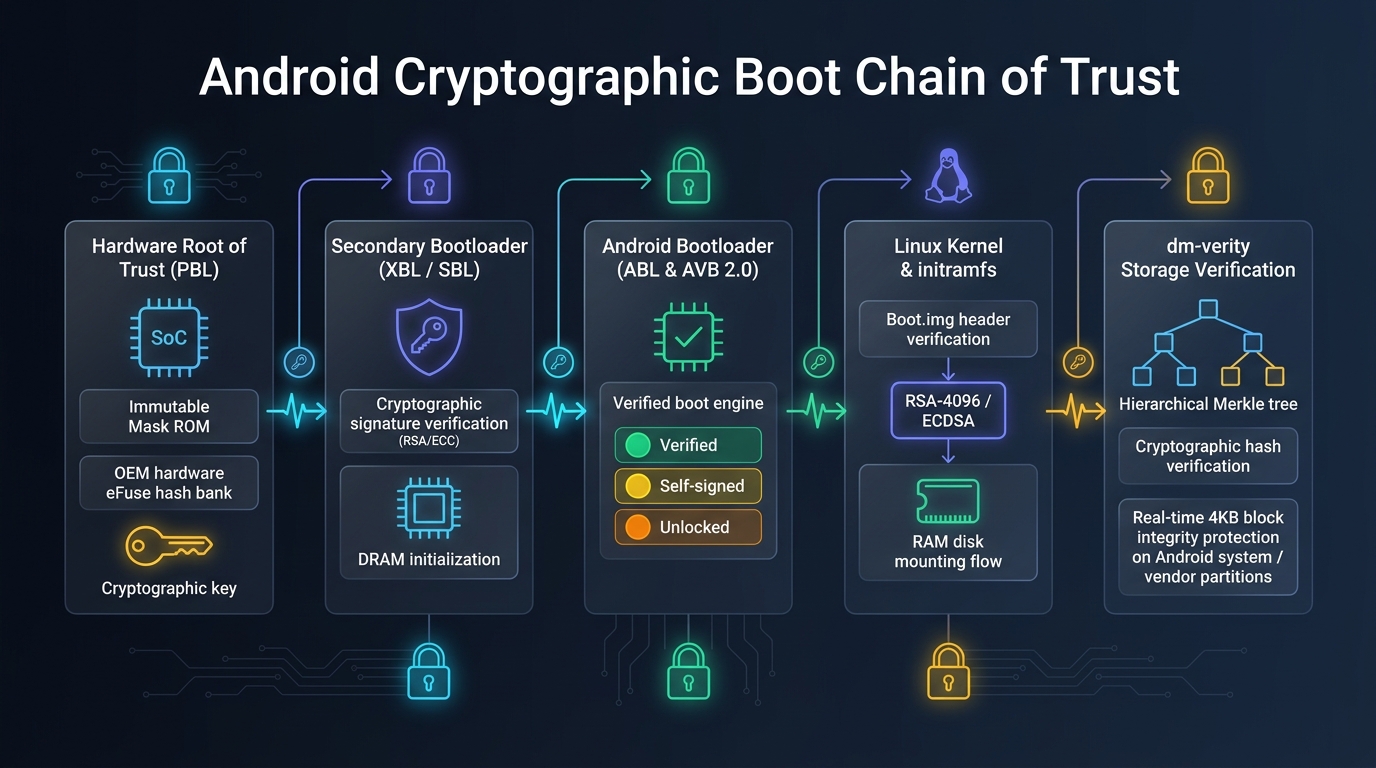
The verification sequence consists of five distinct operational phases:
- Primary Bootloader (PBL) & Hardware Root of Trust (RoT): The PBL is burned directly into the System-on-Chip (SoC) Mask ROM during silicon manufacturing. It cannot be modified by software. The PBL reads the OEM public key hashes permanently programmed into one-time-programmable hardware fuses (eFuses).
- Secondary Bootloader (SBL / XBL): The Extensible Bootloader (XBL) is loaded from flash into on-chip SRAM. The PBL verifies its RSA or ECC digital signature against the hardware eFuse keys. Once verified, XBL initializes external DRAM memory, system power rails, and security coprocessors.
- Android Bootloader (ABL): The ABL implements the Fastboot protocol and executes Android Verified Boot (AVB 2.0). It checks whether the bootloader is locked or unlocked, determining the device verification color state:
- Green State: The device is locked and verified with the OEM root of trust key.
- Yellow State: The device boots a custom image verified by a user-installed custom key stored in secure hardware.
- Orange State: The bootloader is unlocked. The device displays a warning screen, and Verified Boot is relaxed.
- Red State: Verification failed or the image is corrupt. The device halts immediately to prevent booting compromised software.
- Linux Kernel & Initial RAM Disk (initramfs): The ABL validates cryptographic signatures embedded in the
boot.imgheader. It loads the Linux kernel andinitramfsinto DRAM, passing kernel command-line parameters that specify the root filesystem. - Device Mapper Verity (dm-verity): When mounting system partitions (such as
/systemand/vendor), the Linux kernel uses thedm-veritydriver. It checks every 4 KB filesystem block against a cryptographic Merkle hash tree in real time. If a single block has been altered on disk, I/O operations return an error, preventing rootkit execution.
Android Partition Architecture
Mobile devices do not use a single monolithic disk volume. Instead, internal flash storage (UFS or eMMC) is divided into dozens of strictly isolated partitions, each serving a distinct operational purpose.
- /boot: Contains the compiled Linux kernel binary and the core ramdisk. In modern Android versions, this is split into
boot(generic kernel image),init_boot(generic ramdisk), andvendor_boot(OEM hardware modules and device tree blobs). - /system: The core Android operating system framework, standard libraries, and system applications. This partition is mounted read-only during normal operation.
- /vendor: Houses proprietary hardware drivers, HAL (Hardware Abstraction Layer) implementations, and SoC binaries. Under Project Treble, this separation allows the core Android OS to be upgraded without recompiling vendor device drivers.
- /product & /system_ext: Partitions dedicated to OEM-specific applications, system customizations, and mobile carrier configurations.
- /userdata: The partition where user files, downloaded applications, and databases live. It is encrypted with file-based encryption (FBE) and protected by biometric or passcode credentials.
- /modem (Radio): Contains low-level baseband firmware for cellular modems, Wi-Fi, and Bluetooth controllers. Overwriting this partition with an incompatible build can permanently disable cellular networks.
Dynamic Partitions and the Super Partition
Beginning in Android 10, Google introduced Dynamic Partitions to eliminate the problem of partition sizing constraints. In earlier devices, OEM manufacturers had to predict the maximum size of system, vendor, and product at manufacturing time. If system became full during a software update, the device could not be upgraded, even if vendor had gigabytes of unused space.
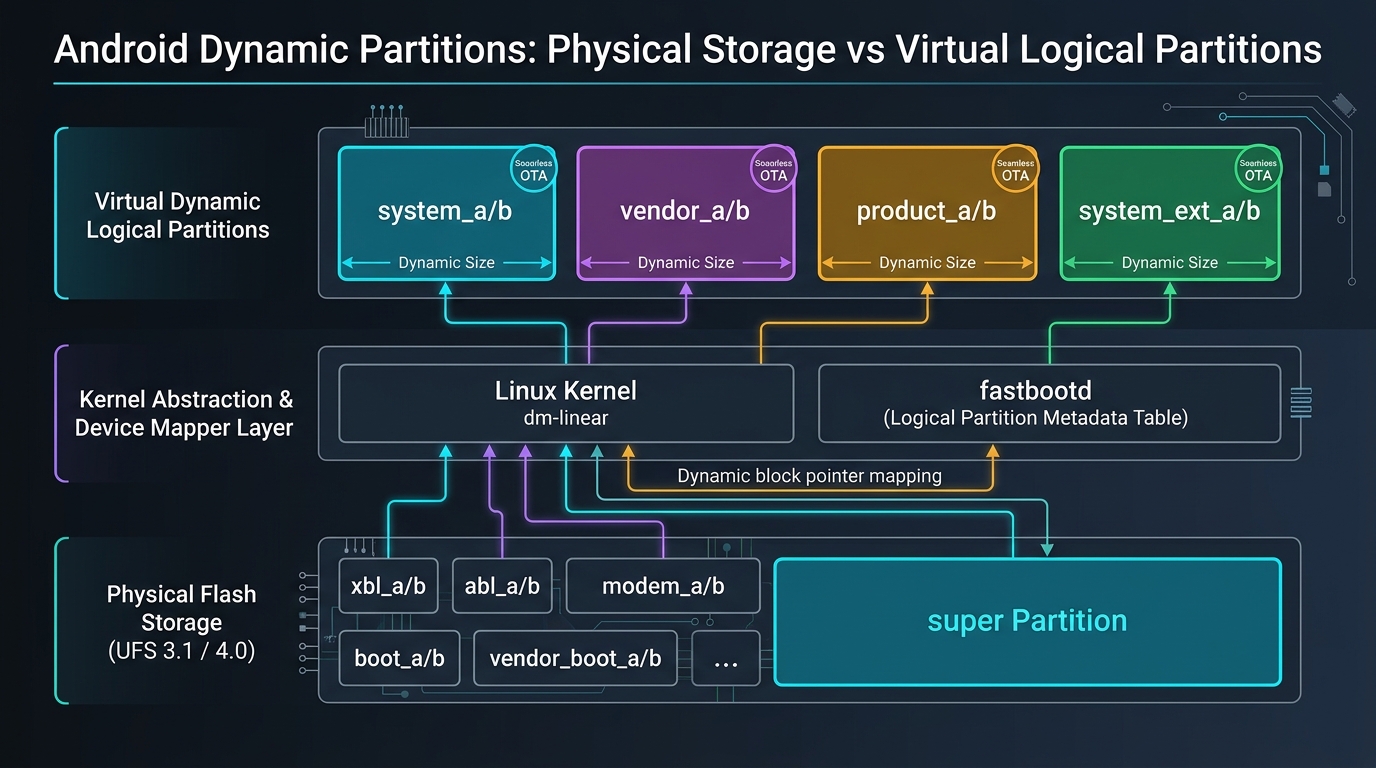
Dynamic partitions solve this through software virtualization:
- Physical Storage Container: Physical flash storage reserves one large physical partition called
super. Static boot partitions (likeboot,xbl, andmodem) remain outsidesuper. - Kernel dm-linear Mapping: The Linux kernel uses the
dm-lineardevice-mapper driver. It reads a metadata table from the beginning of thesuperpartition and maps contiguous logical volumes across available blocks. - Userspace Fastbootd: Because standard bootloader Fastboot runs before the Linux kernel loads, it lacks the complex
dm-lineardrivers needed to manage dynamic volumes. Android introducedfastbootd, a user-space Fastboot daemon that runs inside the Recovery subsystem. When you flash a dynamic partition, the device reboots from bootloader mode intofastbootdmode to resize and write logical volumes safely.
A/B Seamless Updates and Zero-Downtime Slots
In legacy Android architectures, installing a system update required rebooting into Recovery mode, displaying an installation spinner for fifteen minutes, and praying that the battery did not fail mid-write. If power was lost during flashing, the partition was corrupted and the device entered a hard brick state.
Modern devices solve this through A/B Partition Layouts (Seamless Updates). For a full architectural deep dive and state machine analysis, read our Deep Dive into Android A/B System Updates, or learn how to transfer binary patches over the wire in our Delta Firmware Update Service in Spring Boot 4.
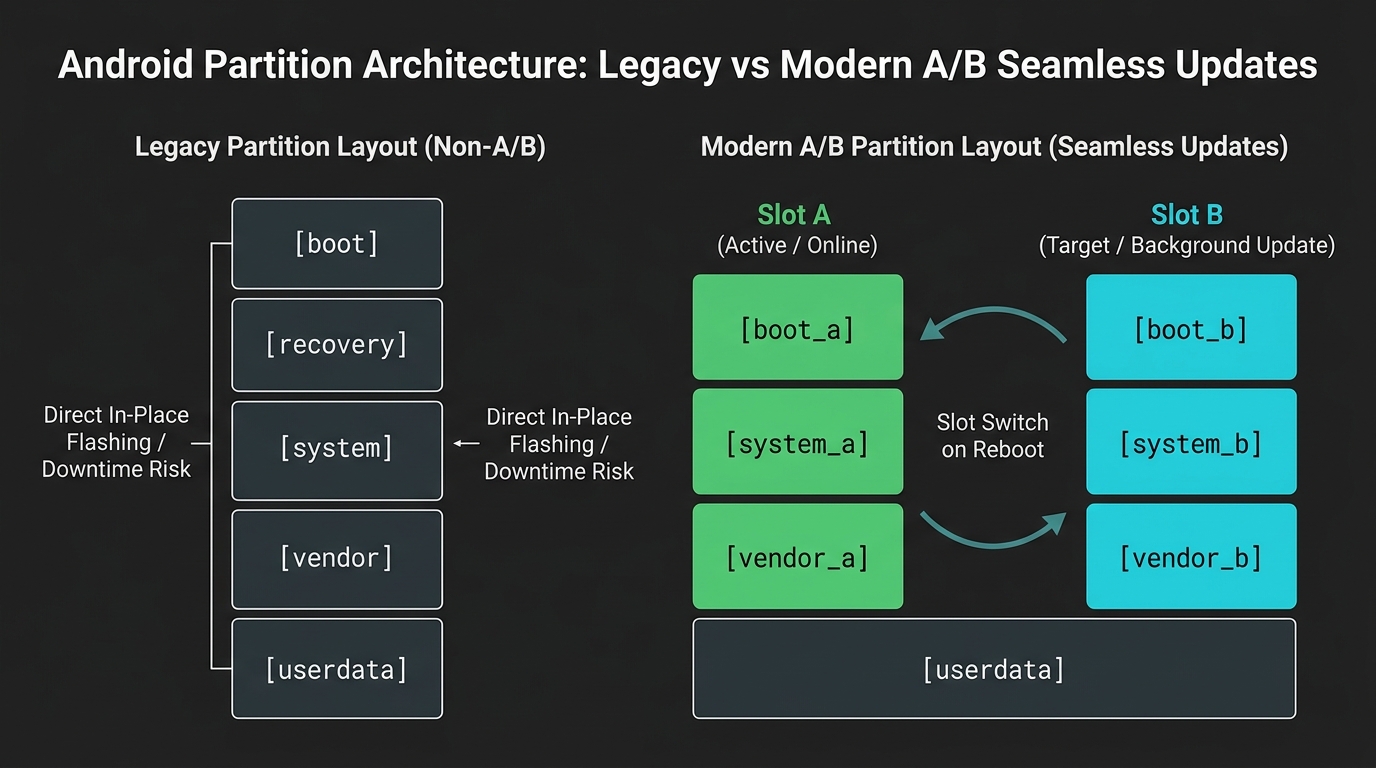
Instead of having a single /system and /boot partition, the flash memory contains duplicate slots: Slot A and Slot B.
- Active Slot Operation: While you use your phone, the device runs entirely from Slot A.
- Background Streaming: The Android update service downloads the new OS payload and writes it directly to the inactive Slot B in the background. Your phone remains completely usable.
- Slot Switching: After writing and verifying checksums, the system updates metadata in the bootloader control block, marking Slot B as the active boot slot on the next restart.
- Instant Booting: Rebooting simply tells the bootloader to load kernel binaries from Slot B. The reboot takes less than thirty seconds.
- Anti-Bootloop Fallback: If Slot B fails to reach the Android framework after three boot attempts, the hardware watchdog triggers a rollback, automatically reverting the active pointer back to Slot A.
Flashing Mechanics and Fastboot Sparse Images
Modern operating system images are several gigabytes in size. However, a formatted ext4 or EROFS partition image often contains large swaths of empty, zeroed blocks. Writing gigabytes of zero blocks across USB would waste time and wear out flash memory cells unnecessarily.
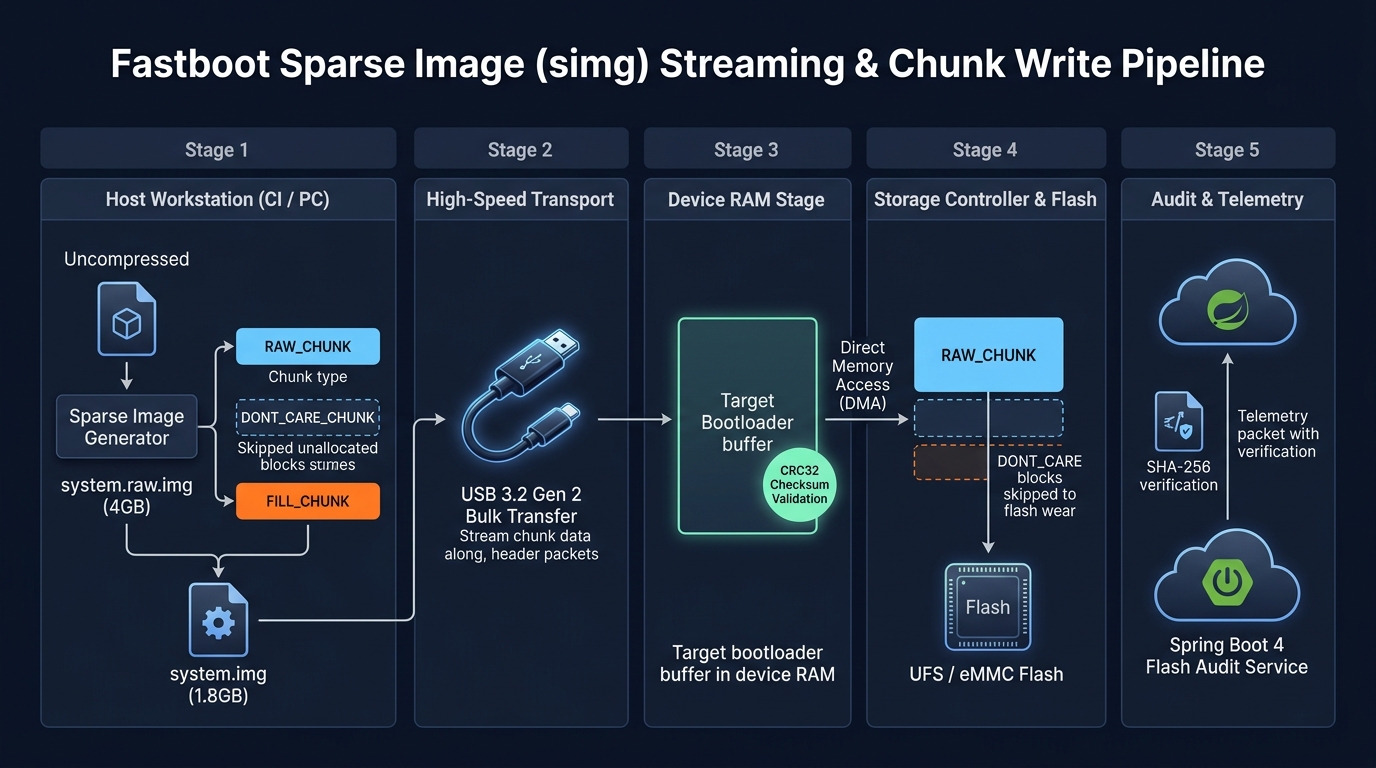
To optimize this pipeline, the Android build system generates sparse images (simg format):
- Chunk Classification: The sparse image generator inspects the raw disk image and divides it into 4 KB chunks. Actual file data is wrapped into
RAW_CHUNKstructures. Unallocated blocks containing only zeros are converted into lightweightDONT_CARE_CHUNKmetadata markers. - High-Speed Streaming: The host computer streams the sparse image across the USB bulk endpoint in chunks that match the device’s RAM buffer limit (often 512 MB to 1 GB max download size).
- RAM Validation: The Fastboot receiver on the device buffers the incoming chunk in volatile DRAM and validates its 32-bit CRC32 checksum.
- Direct Flash DMA: The storage controller uses Direct Memory Access (DMA) to write
RAW_CHUNKpayload data directly to physical UFS/eMMC blocks. ForDONT_CARE_CHUNKmarkers, the controller completely skips the blocks, preserving flash write endurance and cutting flashing time in half.
Comparative Analysis: Flashing Tools and Protocols
Different development and repair scenarios require different flashing protocols. The following matrix compares the four primary methods used in mobile engineering:
| Protocol / Tool | Operating Level | Transport Interface | Signature Required | Target Partitions | Brick Recovery Capability | Primary Use Case |
|---|---|---|---|---|---|---|
| Fastboot (ABL) | Android Bootloader Mode | USB Bulk Endpoint | Yes (Unless Unlocked) | Physical static partitions (boot, modem, super) | Recovers soft bricks (bootloops) | Developer flashing, manual kernel and firmware updates |
| Fastbootd | Recovery Subsystem User Space | USB Bulk / TCP Network | Yes (Unless Unlocked) | Dynamic virtual partitions (system, vendor, product) | Recovers logical partition errors | Flashing Android 10+ dynamic partitions |
| ADB Sideload | Recovery OS Mode | USB ADB Protocol | Yes (OEM / Recovery Key) | Full system OTA archives (zip packages) | Recovers failed OTA updates | Applying official system upgrades and patches |
| Qualcomm EDL / Odin | SoC Silicon Emergency Mode (PBL) | Raw Virtual COM Port (HS-USB 9008) | Yes (Programmer Firehose Signature) | Entire NAND flash (repartitions physical storage) | Recovers hard bricks (dead bootloader) | Factory assembly lines and unbricking dead hardware |
Real-World Enterprise Use Cases
Understanding flashing mechanics is essential beyond enthusiast custom ROMs. High-scale enterprise systems rely on automated flashing daily:
1. Automated OEM Factory and Refurbishment Lines
Smartphone trade-in and refurbishment facilities process tens of thousands of devices per week. Automated testing benches connect devices to industrial USB hubs running automated Fastboot scripts. The service queries fastboot getvar serialno, flashes certified stock images, executes diagnostic hardware tests, logs completion status to centralized databases, and locks the bootloader automatically.
2. Android Automotive OS (AAOS) In-Vehicle Systems
Modern connected cars run Android Automotive on digital instrument clusters and infotainment head units. Vehicle maintenance technicians use specialized diagnostic Ethernet and USB interfaces to flash firmware updates. Because in-vehicle hardware failure is a critical safety issue, AAOS relies heavily on A/B dual slots, hardware watchdog fallback, and dm-verity cryptographic isolation.
3. Rugged Enterprise Handhelds and Retail Kiosks
Logistics companies (e.g., DHL, FedEx) and retail chains deploy hundreds of thousands of rugged Android handheld barcode scanners. Mobile Device Management (MDM) servers coordinate staged updates. Fleet managers monitor canary updates (see our guide on Managing OTA Canary Rollouts with Spring Boot and Redis) and audit device flash logs to track compliance across all distributed devices.
Production Guidelines & Best Practices
Flashing firmware requires strict adherence to safety checks to prevent permanent device hardware failure:
- Strict Power Thresholds: Writing to flash memory consumes high transient current. If the battery dies while the bootloader partition is being updated, the device will suffer a hard brick. Industrial flashing software must reject flashing if the battery state is below 50%.
- Verified USB Cabling and Ports: High-speed USB communication can fail due to loose cables or USB hub signal attenuation. Always use short, shielded cables connected directly to host motherboard ports.
- Pre-Flash Parameter Verification: Before sending images, execute
fastboot getvar all. Confirm the product model, hardware revision, current active slot, and secure boot status to prevent flashing incompatible firmware. - Cryptographic Checksum Verification: Always compute the SHA-256 hash of the downloaded image file on the host machine before sending it to the device, comparing it against the manufacturer’s signed release manifest.
Common Mistakes & Critical Pitfalls
Here are three common pitfalls encountered during Android firmware flashing, along with concrete engineering solutions:
1. Anti-Rollback Protection (ARB) Fuse Triggering
The Hazard: Modern SoCs contain a set of hardware eFuses known as the Anti-Rollback (ARB) counter. Each major security patch increments this index. If you flash an older firmware build with an ARB index lower than the hardware fuse value, the Primary Bootloader permanently refuses to boot, forcing the device into Qualcomm Emergency Download (EDL) mode.
The Fix: Always inspect the build fingerprint and security patch level before downgrading. Never flash firmware where ro.build.version.security_patch is older than the current device state unless the device vendor explicitly supports ARB bypass in engineering bootloaders.
2. Corrupted Baseband Modem Partitions
The Hazard: Flashing a global firmware build onto a device designed for a different regional frequency band can overwrite the modem, fsg, or persist partitions. This corrupts NVRAM calibration tables, leading to a permanent “Null IMEI” error and loss of cellular connectivity.
The Fix: Exclude modem and persistent radio partitions when testing custom Android OS builds. Keep a verified backup of the device’s persist and nvram partitions before performing low-level partition alterations.
3. USB Disconnection During Bootloader Flashing
The Hazard: While a failed flash on the system partition can be resolved by reflashing in Fastboot, an interrupted write to the abl (Android Bootloader) or xbl (Secondary Bootloader) partition destroys the very code needed to provide the Fastboot interface.
The Fix: On A/B devices, update bootloader partitions on the inactive slot first, verify write checksums, and only switch active slots after successful validation. In automated CI/CD flashing pipelines, employ uninterruptible power supplies (UPS) and locked USB-C industrial clamping connectors.
Companion Code: Device Flashing Audit Service
In high-throughput repair centers and device testing labs, thousands of devices are flashed every day. To track firmware updates, record partition checksums, and detect flash errors, we built a companion microservice in Spring Boot 4 and Java 25.
This service exposes REST endpoints to record flashing events and retrieve device history, backed by a PostgreSQL database and verified using Testcontainers (see our testing approach in TDD with Spring Boot 4 and Testcontainers).
The Flash Audit Controller
package com.webcodein.flashing.controller;

import com.webcodein.flashing.model.FlashAudit;
import com.webcodein.flashing.repository.FlashAuditRepository;
import org.springframework.http.ResponseEntity;
import org.springframework.web.bind.annotation.*;

import java.util.List;

@RestController
@RequestMapping("/api/audit")
public class FlashAuditController {

    private final FlashAuditRepository repository;

    public FlashAuditController(FlashAuditRepository repository) {
        this.repository = repository;
    }

    @PostMapping
    public ResponseEntity<FlashAudit> logFlashEvent(@RequestBody FlashAudit audit) {
        FlashAudit saved = repository.save(
            new FlashAudit(
                audit.getDeviceSerialNumber(),
                audit.getPartitionName(),
                audit.getImageChecksum(),
                audit.isSuccessful()
            )
        );
        return ResponseEntity.ok(saved);
    }

    @GetMapping("/{serialNumber}")
    public ResponseEntity<List<FlashAudit>> getDeviceHistory(@PathVariable String serialNumber) {
        return ResponseEntity.ok(repository.findByDeviceSerialNumber(serialNumber));
    }
}
You can inspect and run the complete companion project on GitHub in the learn.webcodein.workshop repository.
Conclusion
Flashing an Android phone is an intricate coordination between hardware silicon roots of trust, low-level bootloaders, the Fastboot protocol, and modern partition virtualization. By transitioning from monolithic partitions to dynamic dm-linear super volumes and dual-slot A/B updates, modern mobile architectures provide exceptional resilience against software corruption and bootloops.
Frequently Asked Questions
What is the technical difference between Fastboot and ADB?
ADB (Android Debug Bridge) runs inside the active Android operating system or recovery daemon. It allows developers to transfer files, read logcat streams, and execute shell commands. Fastboot runs inside the device bootloader before the Linux kernel boots. It operates at a lower abstraction level, writing raw binary images directly to physical flash storage blocks.
Can a locked bootloader be flashed via Fastboot?
Yes, but only with official firmware packages cryptographically signed with the OEM’s private key. The bootloader verifies the digital signature against the hardware root of trust. If you attempt to flash an unsigned or custom image while the bootloader is locked, the command will be rejected with a signature verification failure.
What is the difference between a soft brick and a hard brick?
A soft brick occurs when system partitions are corrupted or misconfigured, causing a bootloop, but the bootloader and Fastboot interface remain functional. You can fix a soft brick by flashing valid partition images via Fastboot. A hard brick occurs when low-level bootloader partitions (such as PBL, XBL, or ABL) are corrupted or hardware fuses trip, preventing the screen or USB from initializing without factory EDL jigging.
What is fastbootd and why was it introduced in Android 10?
Fastbootd is a user-space implementation of the Fastboot protocol running inside the Android Recovery subsystem. It was introduced alongside Dynamic Partitions because the low-level bootloader lacks the Linux kernel dm-linear device-mapper drivers required to dynamically resize and map virtual logical partitions inside the super container.
How does dm-verity prevent unauthorized system tampering?
Device Mapper Verity (dm-verity) builds a cryptographic Merkle hash tree over every 4 KB block of the system partition. The root hash of the tree is signed by the OEM private key and verified by the bootloader. Whenever the Linux kernel reads a block from storage, it verifies its hash against the tree. If any byte was modified, the read fails immediately, preventing rootkits from executing.
References
- Android Open Source Project (AOSP) — Bootloader & Boot Flow Architecture
- AOSP Documentation — A/B (Seamless) System Updates Architecture
- AOSP Documentation — Android Verified Boot (AVB 2.0)
- AOSP Documentation — Implementing Dynamic Partitions & Fastbootd
- Spring Boot Reference Documentation
- Testcontainers — Official PostgreSQL Module