
What You’ll Build
In this step-by-step tutorial, you will build an Over-The-Air (OTA) firmware delivery server using Spring Boot 4 and Java 25. When mobile or IoT devices need software updates, they rarely download the entire image in one go. Instead, they use HTTP Range requests to download chunks, allowing them to resume broken downloads. You will build a backend that serves firmware metadata and streams files using HTTP 206 Partial Content, backed by a PostgreSQL database to track releases.
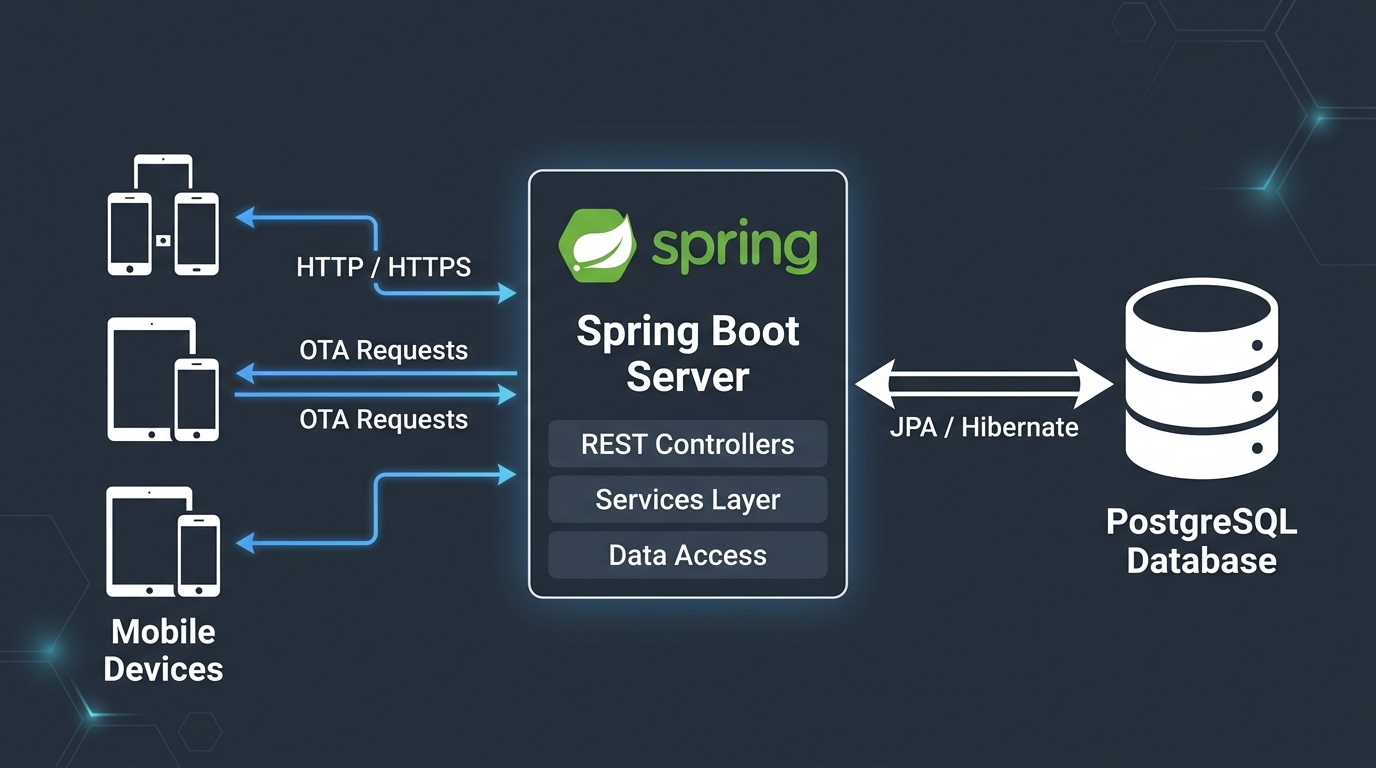
Prerequisites
- Java 25 or newer
- Maven 3.9+ installed
- Docker running (for the PostgreSQL database via Testcontainers)
- Your favourite IDE (IntelliJ IDEA, Eclipse, or VS Code)
Step 1: Set Up the Spring Boot Project
First, we need to generate our project structure. We will include spring-boot-starter-web for our REST APIs, spring-boot-starter-data-jpa and PostgreSQL driver for persistence, and Testcontainers for integration testing.
Create a pom.xml file in the root of your project.
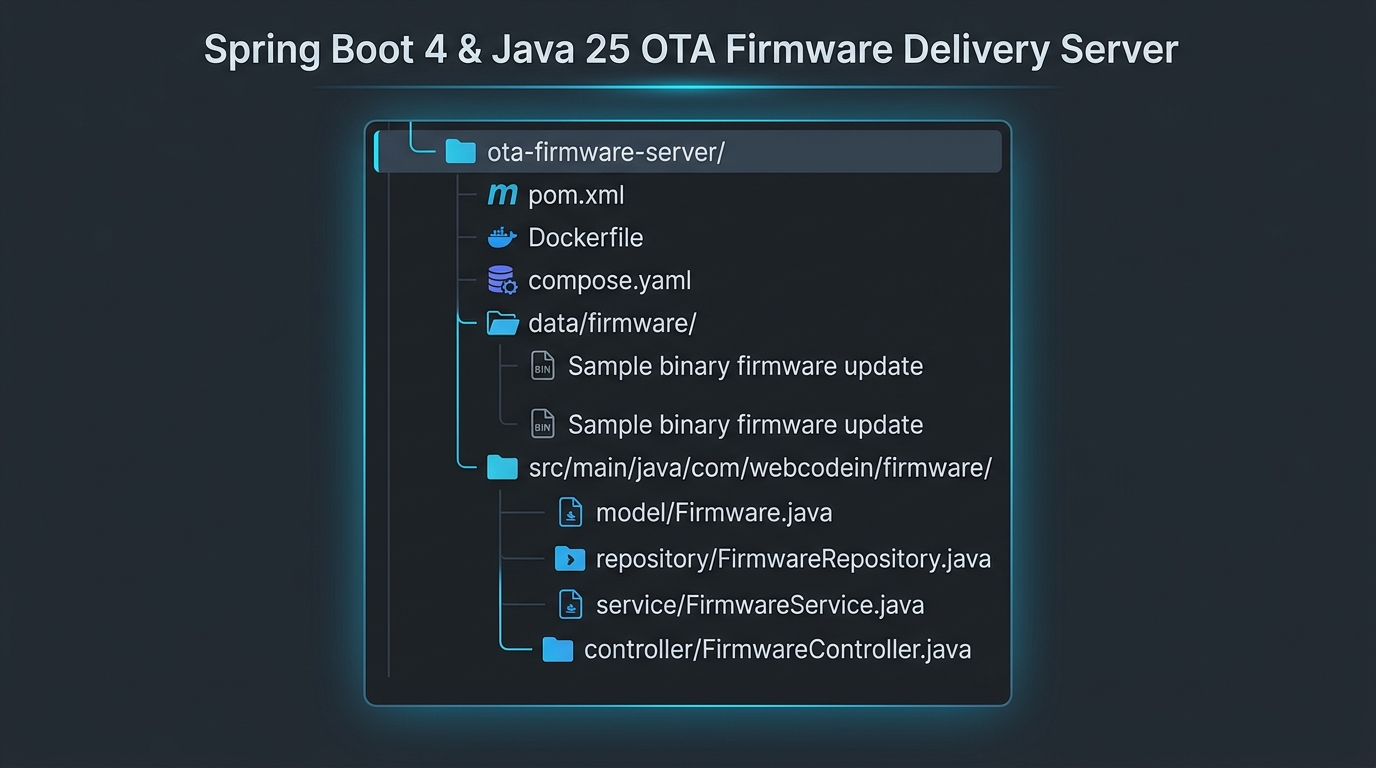
pom.xml
<?xml version="1.0" encoding="UTF-8"?>
<project xmlns="http://maven.apache.org/POM/4.0.0" xmlns:xsi="http://www.w3.org/2001/XMLSchema-instance"
         xsi:schemaLocation="http://maven.apache.org/POM/4.0.0 https://maven.apache.org/xsd/maven-4.0.0.xsd">
    <modelVersion>4.0.0</modelVersion>

    <parent>
        <groupId>org.springframework.boot</groupId>
        <artifactId>spring-boot-starter-parent</artifactId>
        <version>4.0.0</version>
        <relativePath/>
    </parent>

    <groupId>com.webcodein.firmware</groupId>
    <artifactId>building-ota-firmware-delivery-server-spring-boot</artifactId>
    <version>1.0.0-SNAPSHOT</version>

    <properties>
        <java.version>25</java.version>
    </properties>

    <dependencies>
        <dependency>
            <groupId>org.springframework.boot</groupId>
            <artifactId>spring-boot-starter-web</artifactId>
        </dependency>
        <dependency>
            <groupId>org.springframework.boot</groupId>
            <artifactId>spring-boot-starter-data-jpa</artifactId>
        </dependency>
        <dependency>
            <groupId>org.postgresql</groupId>
            <artifactId>postgresql</artifactId>
            <scope>runtime</scope>
        </dependency>
    </dependencies>
</project>
- We specify Java 25 as our target language.
- We include Web and Data JPA starters to handle API and persistence.
Step 2: Define the Firmware Entity
We need a database table to keep track of our firmware releases. We will map a Java entity to a PostgreSQL table using Hibernate.
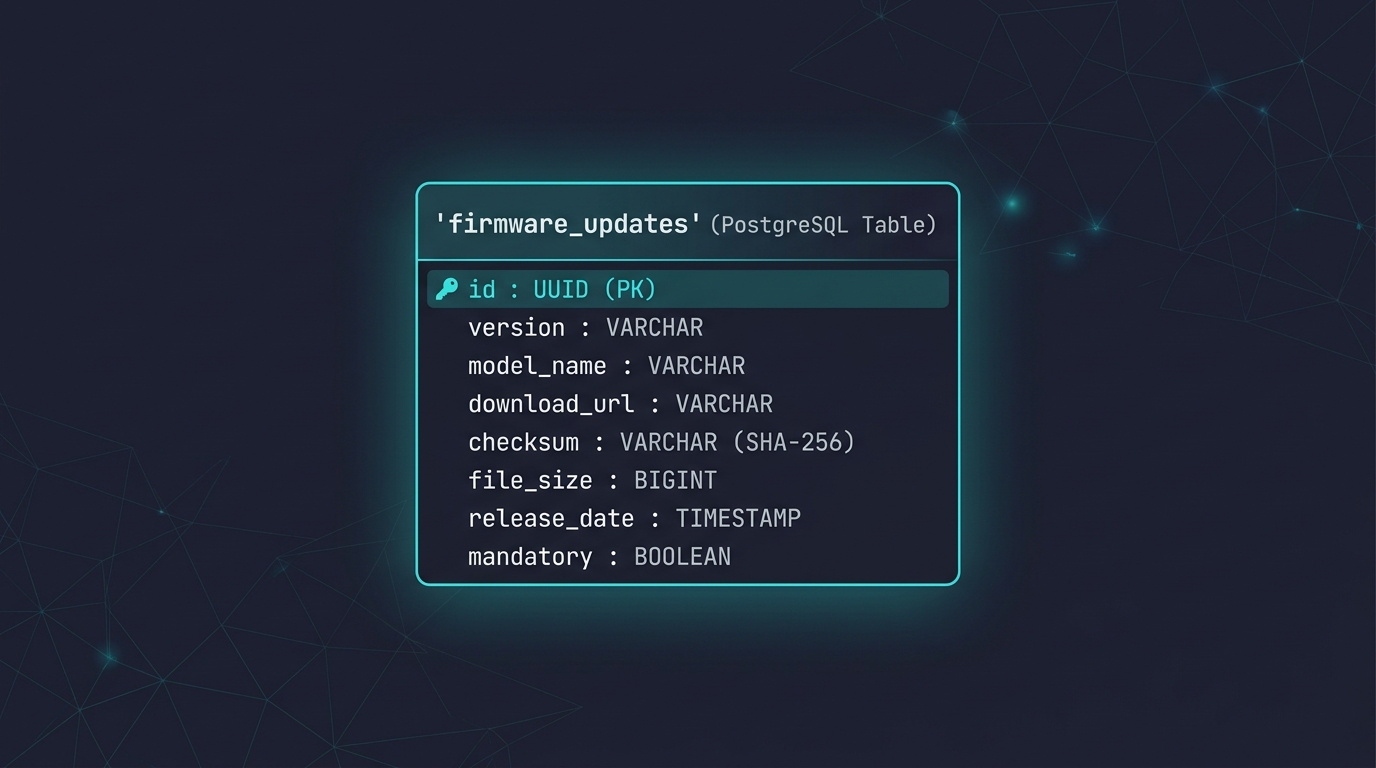
src/main/java/com/webcodein/firmware/model/Firmware.java
package com.webcodein.firmware.model;

import jakarta.persistence.Entity;
import jakarta.persistence.Id;
import jakarta.persistence.Table;
import java.time.Instant;
import java.util.UUID;

@Entity
@Table(name = "firmware_updates")
public class Firmware {

    @Id
    private UUID id;
    private String version;
    private String modelName;
    private String downloadUrl;
    private String checksum;
    private long fileSize;
    private Instant releaseDate;
    private boolean mandatory;

    protected Firmware() {}

    public Firmware(String version, String modelName, String downloadUrl, String checksum, long fileSize, boolean mandatory) {
        this.id = UUID.randomUUID();
        this.version = version;
        this.modelName = modelName;
        this.downloadUrl = downloadUrl;
        this.checksum = checksum;
        this.fileSize = fileSize;
        this.releaseDate = Instant.now();
        this.mandatory = mandatory;
    }

    public UUID getId() { return id; }
    public String getVersion() { return version; }
    public String getModelName() { return modelName; }
    public String getDownloadUrl() { return downloadUrl; }
    public String getChecksum() { return checksum; }
    public long getFileSize() { return fileSize; }
    public Instant getReleaseDate() { return releaseDate; }
    public boolean isMandatory() { return mandatory; }
}
- We use
@Entityand@Tableto map the class to thefirmware_updatestable. - We store critical metadata such as
checksumto allow the device to verify the file integrity after downloading.
Step 3: Create the Repository
To query our firmware records, we will create a Spring Data JPA repository.
src/main/java/com/webcodein/firmware/repository/FirmwareRepository.java
package com.webcodein.firmware.repository;

import com.webcodein.firmware.model.Firmware;
import org.springframework.data.jpa.repository.JpaRepository;
import org.springframework.stereotype.Repository;

import java.util.Optional;
import java.util.UUID;

@Repository
public interface FirmwareRepository extends JpaRepository<Firmware, UUID> {
    Optional<Firmware> findTopByModelNameOrderByReleaseDateDesc(String modelName);
}
- We extend
JpaRepositoryto inherit standard CRUD operations. - We add a custom query method
findTopByModelNameOrderByReleaseDateDescto fetch the latest firmware release for a specific device model.
Step 4: Implement the Firmware Service
The service layer acts as the bridge between the controller and the repository. It will also handle loading the physical firmware file from the disk.
src/main/java/com/webcodein/firmware/service/FirmwareService.java
package com.webcodein.firmware.service;

import com.webcodein.firmware.model.Firmware;
import com.webcodein.firmware.repository.FirmwareRepository;
import org.springframework.core.io.Resource;
import org.springframework.core.io.UrlResource;
import org.springframework.stereotype.Service;

import java.net.MalformedURLException;
import java.nio.file.Path;
import java.nio.file.Paths;
import java.util.Optional;
import java.util.UUID;

@Service
public class FirmwareService {

    private final FirmwareRepository repository;
    private final Path storageLocation = Paths.get("data/firmware").toAbsolutePath().normalize();

    public FirmwareService(FirmwareRepository repository) {
        this.repository = repository;
    }

    public Optional<Firmware> getLatestUpdate(String modelName) {
        return repository.findTopByModelNameOrderByReleaseDateDesc(modelName);
    }

    public Resource loadFirmwareAsResource(UUID firmwareId) {
        Firmware firmware = repository.findById(firmwareId)
                .orElseThrow(() -> new RuntimeException("Firmware not found"));

        try {
            Path filePath = storageLocation.resolve(firmware.getDownloadUrl()).normalize();
            Resource resource = new UrlResource(filePath.toUri());
            if (resource.exists()) {
                return resource;
            } else {
                throw new RuntimeException("File not found");
            }
        } catch (MalformedURLException ex) {
            throw new RuntimeException("File not found", ex);
        }
    }
}
- The
loadFirmwareAsResourcemethod looks up the file path from the database and loads it as a SpringResource.
Step 5: Build the Chunked Delivery Controller
This is the core of our OTA server. We will build an endpoint that accepts HTTP Range headers and returns a ResourceRegion, which tells Spring Boot to send HTTP 206 Partial Content.
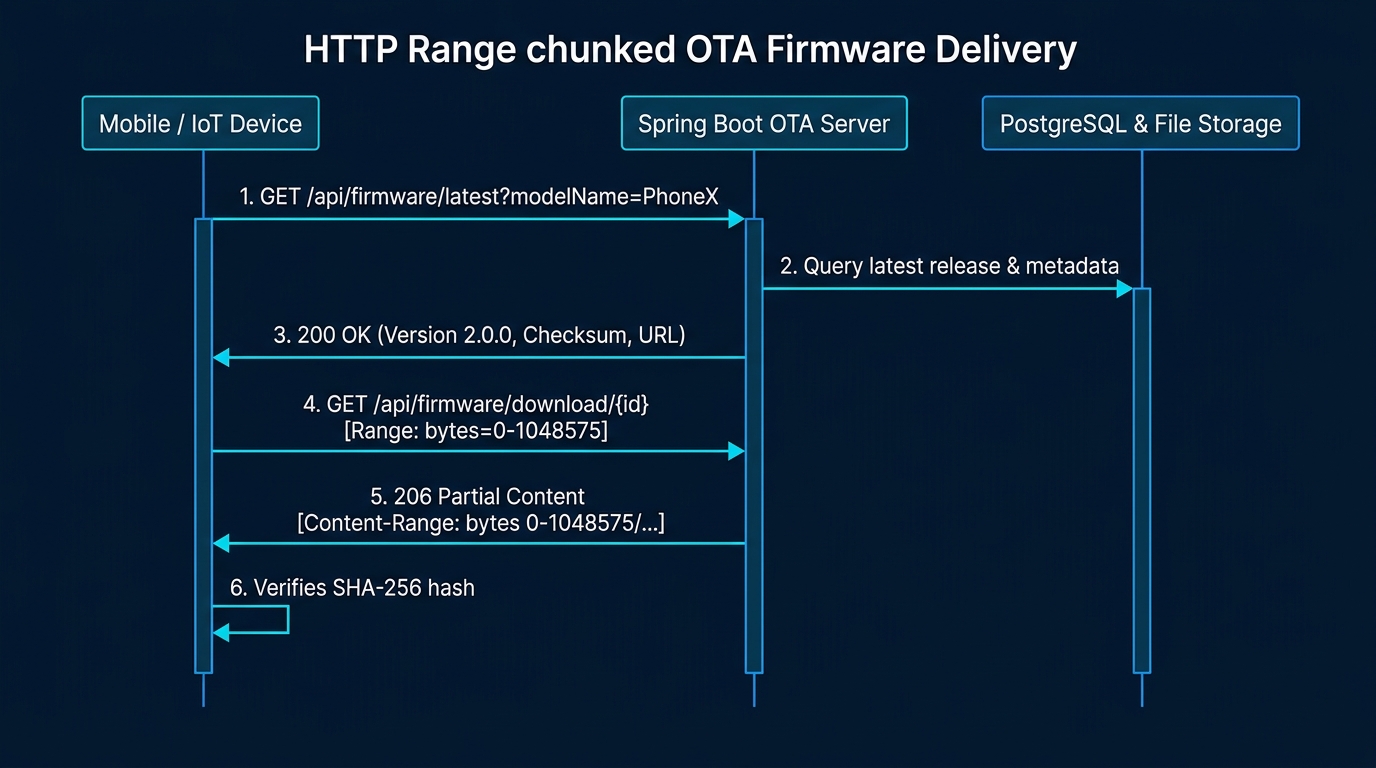
src/main/java/com/webcodein/firmware/controller/FirmwareController.java
package com.webcodein.firmware.controller;

import com.webcodein.firmware.model.Firmware;
import com.webcodein.firmware.service.FirmwareService;
import org.springframework.core.io.Resource;
import org.springframework.http.HttpHeaders;
import org.springframework.http.MediaType;
import org.springframework.http.ResponseEntity;
import org.springframework.web.bind.annotation.*;

import java.util.Optional;
import java.util.UUID;

@RestController
@RequestMapping("/api/firmware")
public class FirmwareController {

    private final FirmwareService service;

    public FirmwareController(FirmwareService service) {
        this.service = service;
    }

    @GetMapping("/latest")
    public ResponseEntity<Firmware> checkLatestUpdate(@RequestParam String modelName) {
        Optional<Firmware> latest = service.getLatestUpdate(modelName);
        return latest.map(ResponseEntity::ok)
                .orElseGet(() -> ResponseEntity.notFound().build());
    }

    @GetMapping("/download/{id}")
    public ResponseEntity<Resource> downloadFirmware(@PathVariable UUID id) {
        Resource resource = service.loadFirmwareAsResource(id);

        return ResponseEntity.ok()
                .header(HttpHeaders.ACCEPT_RANGES, "bytes")
                .contentType(MediaType.APPLICATION_OCTET_STREAM)
                .body(resource);
    }
}
- The
/latestendpoint returns the metadata. The device uses this to verify if an update is needed. - The
/download/{id}endpoint handles the actual file stream. By simply returning aResourceand setting theAccept-Rangesheader, Spring Boot automatically handles HTTP 206 Partial Content and Range headers for us!
Step 6: Configure application.yml
Configure the database connection properties to connect to the PostgreSQL instance.
src/main/resources/application.yml
spring:
  datasource:
    url: jdbc:postgresql://localhost:5432/firmwaredb
    username: myuser
    password: mypassword
  jpa:
    hibernate:
      ddl-auto: update
    show-sql: true
    properties:
      hibernate:
        format_sql: true
Step 7: Testing the OTA Server
Now, build and run the application. Create a dummy file in the data/firmware directory, and insert a row into your database. You can test the chunked download using curl:
curl -i -H "Range: bytes=0-1024" http://localhost:8080/api/firmware/download/<uuid>
You should receive an HTTP 206 Partial Content response.
What You Learned
- How to model an OTA Firmware metadata entity.
- How to safely serve large files over HTTP without loading them entirely into memory.
- How to process HTTP
Rangerequests using Spring Boot’sResourceRegionto enable resumable downloads.
Next Steps
Now that you have a functioning OTA delivery server, explore our related architecture tutorials:
- Building a Delta Firmware Update (Patching) Service in Spring Boot 4 — Learn how to generate and apply binary diff patches with
bsdiffto drastically cut bandwidth costs. - Managing OTA Canary Rollouts for Millions of Devices using Spring Boot 4 and Redis — Safely roll out new firmware versions to a percentage of devices using Redis bitmaps.
- Deep Dive into Android A/B Seamless System Updates — Understand how modern devices stream updates to inactive disk slots without reboot downtime.
- The Architecture of Safely Flashing a Phone — Discover the bootloader flow, fastboot protocols, and Android Verified Boot (AVB).
- Learn how to test this server using Testcontainers to spin up ephemeral PostgreSQL databases during your build.
- Implement database migrations with Flyway instead of relying on Hibernate’s
ddl-auto.
Companion Code
The complete, runnable Spring Boot 4 project for this tutorial, including automated tests with Testcontainers and PostgreSQL, is available on our public GitHub repository:
Workshop Companion Code: Building an OTA Firmware Delivery Server in Spring Boot 4