
In traditional software systems, security teams trusted all internal network traffic. Once a packet passed through the corporate firewall, the perimeter granted implicit trust. Today, cloud-native deployments and distributed microservices render perimeter security obsolete. An attacker who breaches a single container can move laterally across the private network without restriction. Modern enterprise engineering requires a Zero-Trust architecture. Zero-Trust operates under one core rule: never trust, always verify. Every request must carry verifiable cryptographic proof of identity and authorization, regardless of whether it originates from the public internet or an adjacent service mesh sidecar.
This technical guide explains how to construct a production-ready Zero-Trust Resource Server using Java 25, Spring Boot 4.0.0, Spring Security 7, and Keycloak 26 as an OpenID Connect (OIDC) identity provider. You will examine the complete OAuth2 token lifecycle, configure custom JSON Web Token (JWT) claims mapping, enforce role-based access control (RBAC), and write automated integration tests with Testcontainers.
Table of Contents
- 1. Understanding Zero-Trust and OAuth2 Principles
- 2. The OAuth2 and OIDC Token Exchange Lifecycle
- 3. Keycloak Architecture & Realm Setup
- 4. Setting Up Java 25 and Spring Boot 4
- 5. Configuring the Spring Security 7 Filter Chain
- 6. Implementing Protected REST API Endpoints
- 7. Integration Testing with Testcontainers and Keycloak
- 8. Comparative Analysis: Keycloak vs. Cloud Providers
- 9. Real-World Enterprise Use Cases
- 10. Production Hardening & Security Best Practices
- 11. Common Pitfalls and Troubleshooting
- 12. Technical FAQ, Companion Code & References
1. Understanding Zero-Trust and OAuth2 Principles
The traditional security paradigm resembled a castle surrounded by a moat. Outside the walls lay danger; inside the walls resided safety. Modern cloud environments make network perimeters impossible to enforce. Applications run across Kubernetes clusters, multitenant public clouds, and edge locations. As microservices scale, internal network calls outnumber external client calls.
A Zero-Trust architecture establishes three core requirements for every transaction:
- Verify Explicitly: Always authenticate and authorize using all available data points. These data points include user identity, location, service health, and cryptographic claims.
- Enforce Least Privilege: Limit access using Just-In-Time (JIT) and Just-Enough-Access (JEA) controls. Users and backend services only receive the exact scopes required for their tasks.
- Assume Breach: Design systems under the assumption that an attacker already operates inside the network segment. Minimize the blast radius by inspecting and encrypting all traffic end-to-end.
Implementing Zero-Trust requires dividing system responsibilities into dedicated identity and business layers. OAuth 2.0 (RFC 6749) provides the industry-standard authorization framework. OpenID Connect (OIDC) adds an identity layer on top of OAuth 2.0. By using an independent Identity Provider (IdP) like Keycloak, your Spring Boot backend offloads password storage, multi-factor authentication (MFA), and credential rotation. The Java service functions strictly as an OAuth2 Resource Server that validates digitally signed tokens.
To inspect how Zero-Trust extends down to the kernel layer, read our companion guide on Zero-Trust Spring Security 7 and eBPF Service Meshes.
2. The OAuth2 and OIDC Token Exchange Lifecycle
Before writing application code, you must understand how tokens travel between clients, identity providers, and protected APIs. Four distinct actors participate in this communication model:
- Resource Owner: The end user who owns data and grants access to it.
- Client: The frontend application (such as an Angular SPA or mobile app) requesting access on behalf of the user.
- Authorization Server: Keycloak, which authenticates the user, checks credentials, and issues cryptographically signed tokens.
- Resource Server: Our Spring Boot 4 service, which hosts protected API endpoints and validates access tokens on every incoming HTTP call.
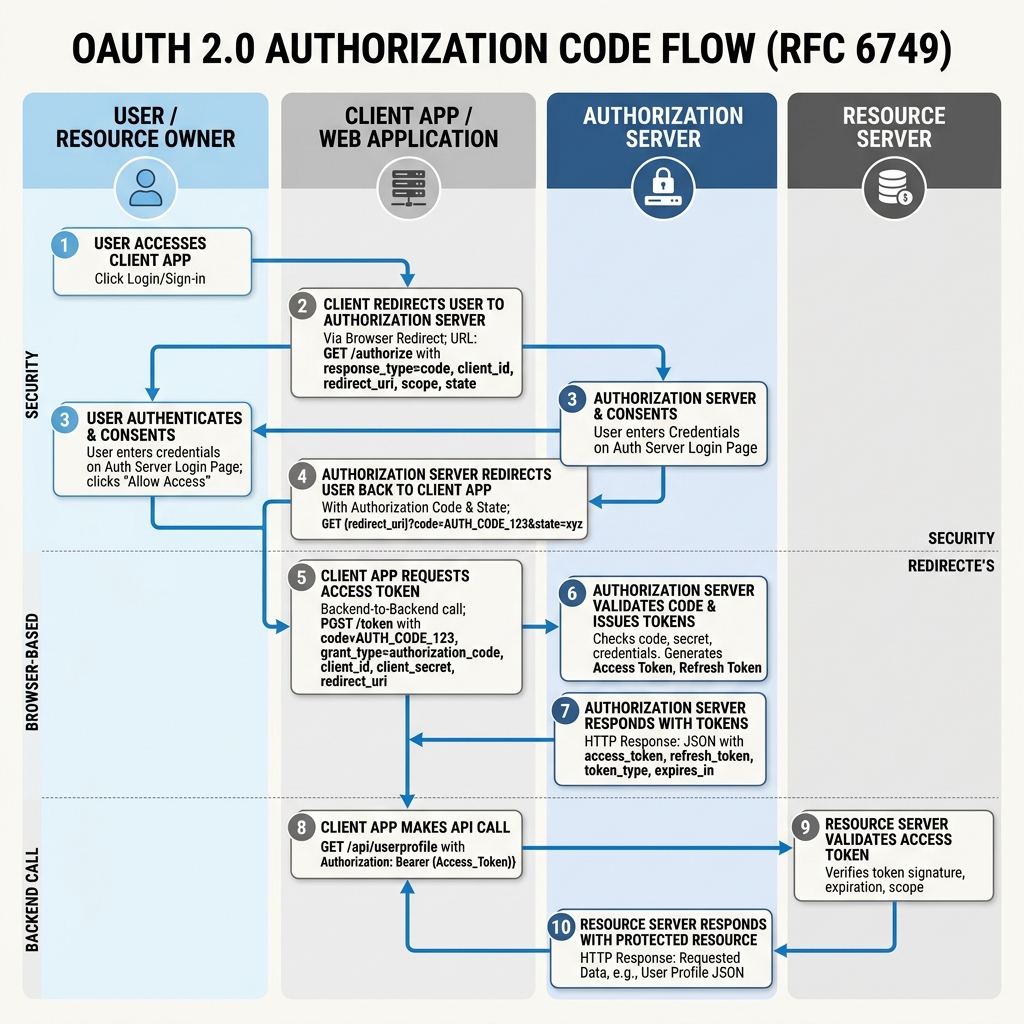
Figure 1 shows the sequence of network operations during an authenticated API request:
- The client redirects the user to Keycloak to log in using the Authorization Code Flow with PKCE (Proof Key for Code Exchange).
- Keycloak authenticates the user credentials, evaluates realm policies, and redirects back to the client with an authorization code.
- The client exchanges this temporary code at Keycloak’s token endpoint (
/protocol/openid-connect/token) for an access token, an ID token, and a refresh token. - The client transmits the access token in the standard HTTP request header:
Authorization: Bearer <token>. - The Spring Boot Resource Server receives the request. It extracts the token, verifies the asymmetric RSA signature using Keycloak’s JSON Web Key Set (JWKS), extracts user roles, and grants access.
3. Keycloak Architecture & Realm Setup
Keycloak is an open-source enterprise Identity and Access Management (IAM) solution maintained by Red Hat. It provides unified identity federation, single sign-on (SSO), social logins, user federation via LDAP or Active Directory, and fine-grained authorization policies.
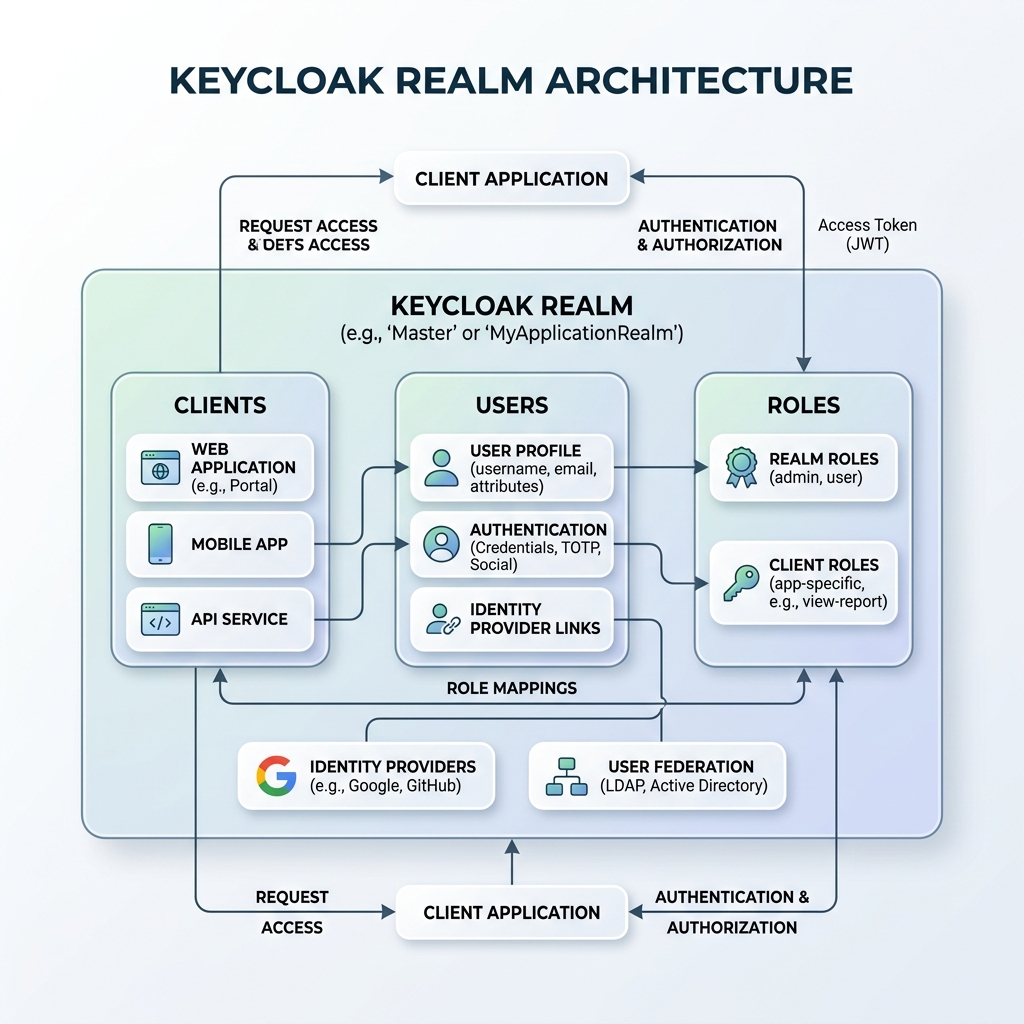
Figure 2 illustrates Keycloak’s structural hierarchy. Keycloak organizes identity domains using the following building blocks:
- Realm: An isolated security boundary. A single Keycloak server can host multiple independent realms (e.g.,
masterfor system administration, andwebcodein-realmfor enterprise applications). Configuration, users, and clients in one realm cannot access data in another realm. - Client: Any entity that can request authentication. For web APIs, we register a client (such as
spring-boot-client) with enabled Direct Access Grants and standard redirect URIs. - Roles: Access tiers assigned to users. Realm roles (like
USERandADMIN) apply across the entire realm, whereas client roles apply to specific applications. - Users: Identity records with credentials, email addresses, and assigned role memberships.
To automate local development, we configure Keycloak using an export file named realm-export.json. This file defines the realm, creates our spring-boot-client, and seeds two test accounts:
{
  "id": "webcodein-realm",
  "realm": "webcodein-realm",
  "enabled": true,
  "verifyEmail": false,
  "users": [
    {
      "username": "testuser",
      "enabled": true,
      "emailVerified": true,
      "email": "testuser@webcodein.com",
      "firstName": "Test",
      "lastName": "User",
      "requiredActions": [],
      "credentials": [
        {
          "type": "password",
          "value": "password",
          "temporary": false
        }
      ],
      "realmRoles": [
        "USER",
        "ADMIN"
      ]
    },
    {
      "username": "regularuser",
      "enabled": true,
      "emailVerified": true,
      "email": "regularuser@webcodein.com",
      "firstName": "Regular",
      "lastName": "User",
      "requiredActions": [],
      "credentials": [
        {
          "type": "password",
          "value": "password",
          "temporary": false
        }
      ],
      "realmRoles": [
        "USER"
      ]
    }
  ],
  "roles": {
    "realm": [
      {
        "name": "USER"
      },
      {
        "name": "ADMIN"
      }
    ]
  },
  "clients": [
    {
      "clientId": "spring-boot-client",
      "enabled": true,
      "publicClient": true,
      "directAccessGrantsEnabled": true,
      "redirectUris": [
        "*"
      ],
      "webOrigins": [
        "*"
      ]
    }
  ]
}
We run Keycloak inside a Docker container using Docker Compose. The configuration uses Keycloak version 26.0.0 and imports the realm definition during startup:
services:
  keycloak:
    image: quay.io/keycloak/keycloak:26.0.0
    environment:
      - KEYCLOAK_ADMIN=admin
      - KEYCLOAK_ADMIN_PASSWORD=admin
    ports:
      - "8080:8080"
    command: start-dev --import-realm
    volumes:
      - ./realm-export.json:/opt/keycloak/data/import/realm-export.json
4. Setting Up Java 25 and Spring Boot 4
Let us create the Spring Boot Resource Server. We use Java 25 and Spring Boot 4.0.0. The project relies on Spring Security 7’s OAuth2 Resource Server starter to handle JWT decoding, signature validation, and authorization filters.
Open your pom.xml file and configure the essential dependencies:
<?xml version="1.0" encoding="UTF-8"?>
<project xmlns="http://maven.apache.org/POM/4.0.0" xmlns:xsi="http://www.w3.org/2001/XMLSchema-instance"
         xsi:schemaLocation="http://maven.apache.org/POM/4.0.0 https://maven.apache.org/xsd/maven-4.0.0.xsd">
    <modelVersion>4.0.0</modelVersion>

    <parent>
        <groupId>org.springframework.boot</groupId>
        <artifactId>spring-boot-starter-parent</artifactId>
        <version>4.0.0</version>
        <relativePath/>
    </parent>

    <groupId>com.webcodein.security</groupId>
    <artifactId>zero-trust-oauth2-keycloak</artifactId>
    <version>1.0.0-SNAPSHOT</version>
    <name>zero-trust-oauth2-keycloak</name>
    <description>Workshop: Zero-Trust OAuth2 with Keycloak in Java 25</description>

    <properties>
        <java.version>25</java.version>
    </properties>

    <dependencies>
        <!-- Spring Boot Web & Security Starters -->
        <dependency>
            <groupId>org.springframework.boot</groupId>
            <artifactId>spring-boot-starter-web</artifactId>
        </dependency>
        <dependency>
            <groupId>org.springframework.boot</groupId>
            <artifactId>spring-boot-starter-security</artifactId>
        </dependency>
        <dependency>
            <groupId>org.springframework.boot</groupId>
            <artifactId>spring-boot-starter-oauth2-resource-server</artifactId>
        </dependency>

        <!-- Docker Compose Support -->
        <dependency>
            <groupId>org.springframework.boot</groupId>
            <artifactId>spring-boot-docker-compose</artifactId>
            <scope>runtime</scope>
            <optional>true</optional>
        </dependency>

        <!-- Testing Dependencies -->
        <dependency>
            <groupId>org.springframework.boot</groupId>
            <artifactId>spring-boot-starter-test</artifactId>
            <scope>test</scope>
        </dependency>
        <dependency>
            <groupId>org.springframework.security</groupId>
            <artifactId>spring-security-test</artifactId>
            <scope>test</scope>
        </dependency>
        <dependency>
            <groupId>org.testcontainers</groupId>
            <artifactId>testcontainers-junit-jupiter</artifactId>
            <scope>test</scope>
        </dependency>
    </dependencies>

    <build>
        <plugins>
            <plugin>
                <groupId>org.springframework.boot</groupId>
                <artifactId>spring-boot-maven-plugin</artifactId>
            </plugin>
        </plugins>
    </build>
</project>
Next, configure application properties in src/main/resources/application.properties. We direct Spring Boot to Keycloak’s realm issuer URI and certificates endpoint:
server.port=8081

# Connect to the Keycloak server running on localhost:8080 via Docker Compose
spring.security.oauth2.resourceserver.jwt.issuer-uri=http://localhost:8080/realms/webcodein-realm
spring.security.oauth2.resourceserver.jwt.jwk-set-uri=http://localhost:8080/realms/webcodein-realm/protocol/openid-connect/certs
Spring Security uses the issuer-uri to verify that incoming tokens originate from the expected realm. It queries jwk-set-uri to download the public keys required to verify RSA token signatures.
5. Configuring the Spring Security 7 Filter Chain
By default, Spring Security treats incoming JWT claims as simple scopes (e.g., SCOPE_read). However, Keycloak packages user roles inside a JSON object named realm_access.roles. If you do not map these claims, Spring Security cannot evaluate hasRole("ADMIN") or hasRole("USER") expressions.

Figure 3 shows how the request travels through Spring Security:
- The
BearerTokenAuthenticationFilterextracts the bearer string from the HTTP header. - The
NimbusJwtDecoderparses the token and checks the digital signature against Keycloak’s cached public key. - Our custom
KeycloakGrantedAuthoritiesConverterextracts role strings fromrealm_access.rolesand prepends theROLE_prefix. - The resulting
JwtAuthenticationTokenpopulates theSecurityContextHolder. - The
AuthorizationFiltervalidates whether the caller holds the required authorities for the requested URI.
Here is the complete Java configuration for SecurityConfig.java:
package com.webcodein.security.zerotrust.config;

import org.springframework.context.annotation.Bean;
import org.springframework.context.annotation.Configuration;
import org.springframework.core.convert.converter.Converter;
import org.springframework.security.config.annotation.web.builders.HttpSecurity;
import org.springframework.security.config.annotation.web.configuration.EnableWebSecurity;
import org.springframework.security.core.GrantedAuthority;
import org.springframework.security.core.authority.SimpleGrantedAuthority;
import org.springframework.security.oauth2.jwt.Jwt;
import org.springframework.security.oauth2.server.resource.authentication.JwtAuthenticationConverter;
import org.springframework.security.oauth2.server.resource.authentication.JwtGrantedAuthoritiesConverter;
import org.springframework.security.web.SecurityFilterChain;

import java.util.Collection;
import java.util.HashSet;
import java.util.Map;
import java.util.Set;

@Configuration
@EnableWebSecurity
public class SecurityConfig {

    @Bean
    public SecurityFilterChain securityFilterChain(HttpSecurity http) throws Exception {
        http
            .authorizeHttpRequests(auth -> auth
                .requestMatchers("/api/public/**").permitAll()
                .requestMatchers("/api/admin/**").hasRole("ADMIN")
                .anyRequest().authenticated()
            )
            .oauth2ResourceServer(oauth2 -> oauth2
                .jwt(jwt -> jwt.jwtAuthenticationConverter(jwtAuthenticationConverter()))
            );
        return http.build();
    }

    @Bean
    public JwtAuthenticationConverter jwtAuthenticationConverter() {
        JwtAuthenticationConverter jwtConverter = new JwtAuthenticationConverter();
        jwtConverter.setJwtGrantedAuthoritiesConverter(new KeycloakGrantedAuthoritiesConverter());
        return jwtConverter;
    }

    public static class KeycloakGrantedAuthoritiesConverter implements Converter<Jwt, Collection<GrantedAuthority>> {
        private final JwtGrantedAuthoritiesConverter defaultConverter = new JwtGrantedAuthoritiesConverter();

        @Override
        public Collection<GrantedAuthority> convert(Jwt jwt) {
            Set<GrantedAuthority> authorities = new HashSet<>();

            // 1. Extract standard OAuth2 scopes (e.g., SCOPE_read, SCOPE_write)
            Collection<GrantedAuthority> defaultAuthorities = defaultConverter.convert(jwt);
            if (defaultAuthorities != null) {
                authorities.addAll(defaultAuthorities);
            }

            // 2. Extract Keycloak Realm Roles from 'realm_access.roles'
            Map<String, Object> realmAccess = jwt.getClaimAsMap("realm_access");
            if (realmAccess != null && realmAccess.get("roles") instanceof Collection<?> roles) {
                for (Object role : roles) {
                    authorities.add(new SimpleGrantedAuthority("ROLE_" + role));
                }
            }

            // 3. Fallback support for custom top-level 'roles' claim
            if (jwt.getClaim("roles") instanceof Collection<?> roles) {
                for (Object role : roles) {
                    authorities.add(new SimpleGrantedAuthority("ROLE_" + role));
                }
            }

            return authorities;
        }
    }
}
This implementation handles three critical security aspects:
- It keeps standard OAuth2 scopes prefixed with
SCOPE_. - It parses Keycloak’s nested
realm_access.rolesarray and maps items toROLE_USERandROLE_ADMIN. - It checks for a top-level
rolesclaim if your identity administrator configured a custom token mapper in Keycloak.
For fine-grained domain object filtering at the database layer, explore our in-depth guides on Spring Security ACL in Spring Boot 4 and PostgreSQL Row-Level Security.
6. Implementing Protected REST API Endpoints
With Spring Security configured, we implement our REST controller. The controller defines three endpoints to demonstrate public access, user access, and administrative role boundaries:
package com.webcodein.security.zerotrust.controller;

import org.springframework.security.core.annotation.AuthenticationPrincipal;
import org.springframework.security.oauth2.jwt.Jwt;
import org.springframework.web.bind.annotation.GetMapping;
import org.springframework.web.bind.annotation.RequestMapping;
import org.springframework.web.bind.annotation.RestController;

import java.util.Map;

@RestController
@RequestMapping("/api")
public class ApiController {

    @GetMapping("/public/hello")
    public Map<String, String> publicHello() {
        return Map.of("message", "Hello, this is a public endpoint.");
    }

    @GetMapping("/secure/hello")
    public Map<String, String> secureHello(@AuthenticationPrincipal Jwt jwt) {
        String username = jwt.getClaimAsString("preferred_username");
        return Map.of("message", "Hello " + username + ", you are authenticated via Zero-Trust OAuth2.");
    }

    @GetMapping("/admin/dashboard")
    public Map<String, String> adminDashboard() {
        return Map.of("message", "Welcome to the Admin Dashboard.");
    }
}
Notice the @AuthenticationPrincipal Jwt jwt parameter on the /api/secure/hello endpoint. Spring Security automatically injects the validated JWT instance. This allows the business logic to read claims such as preferred_username, email, or tenant identifiers without making external database queries.
7. Integration Testing with Testcontainers and Keycloak
Zero-Trust configurations must undergo automated end-to-end verification. Mocking security contexts with unit tests is helpful, but mocks do not test token signature verification, JWKS endpoint queries, or token expiry handling. Testcontainers allows you to execute integration tests against a real Keycloak instance running in Docker.
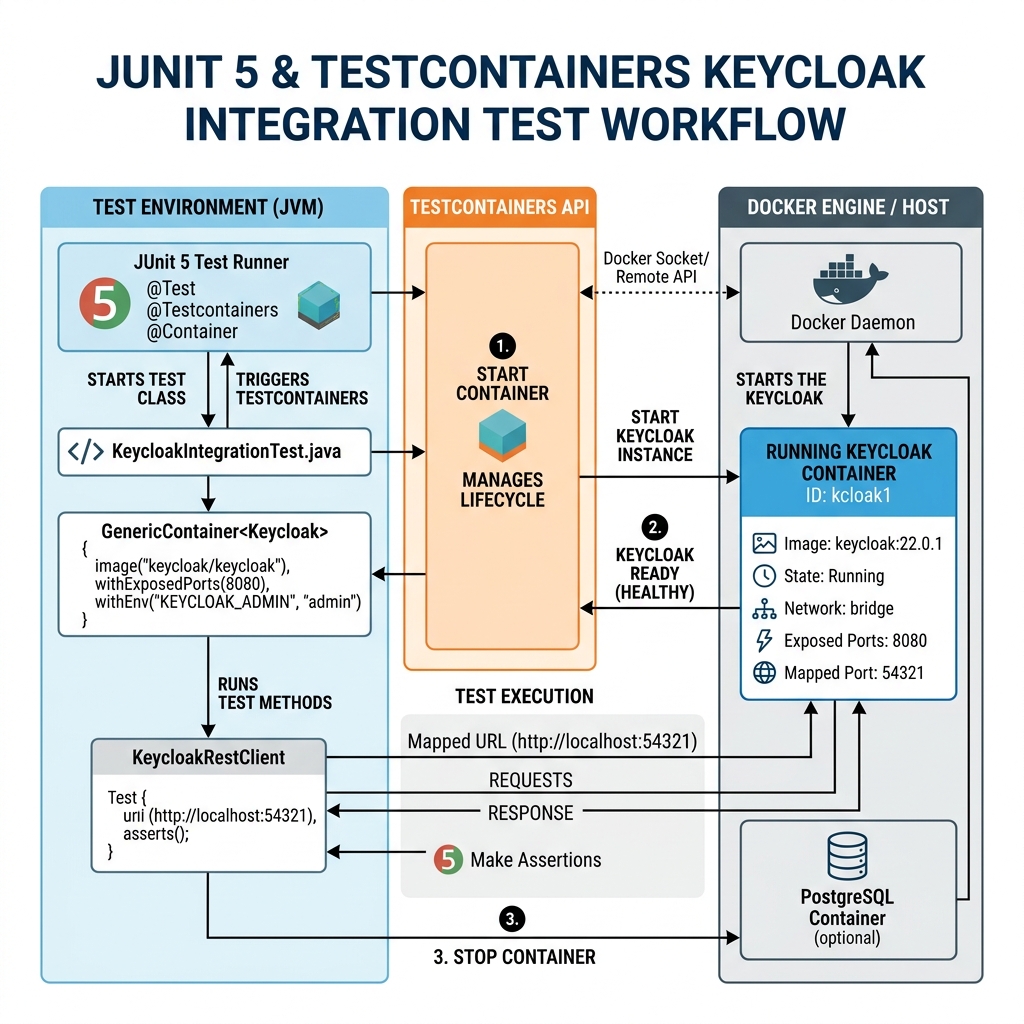
Figure 4 outlines the automated test workflow. When the test execution begins, Testcontainers starts Keycloak, imports realm-export.json, binds random TCP ports, and dynamically injects the resulting URLs into Spring Boot’s application context.
Here is the full integration test class ZeroTrustKeycloakIntegrationTest.java:
package com.webcodein.security.zerotrust;

import org.junit.jupiter.api.DisplayName;
import org.junit.jupiter.api.Test;
import org.springframework.boot.test.context.SpringBootTest;
import org.springframework.boot.test.web.server.LocalServerPort;
import org.springframework.test.context.DynamicPropertyRegistry;
import org.springframework.test.context.DynamicPropertySource;
import org.testcontainers.containers.GenericContainer;
import org.testcontainers.containers.wait.strategy.Wait;
import org.testcontainers.junit.jupiter.Container;
import org.testcontainers.junit.jupiter.Testcontainers;
import org.testcontainers.utility.MountableFile;

import java.net.URI;
import java.net.URLEncoder;
import java.net.http.HttpClient;
import java.net.http.HttpRequest;
import java.net.http.HttpResponse;
import java.nio.charset.StandardCharsets;
import java.time.Duration;

import static org.assertj.core.api.Assertions.assertThat;

@Testcontainers
@SpringBootTest(webEnvironment = SpringBootTest.WebEnvironment.RANDOM_PORT)
class ZeroTrustKeycloakIntegrationTest {

    @Container
    static GenericContainer<?> keycloak = new GenericContainer<>("quay.io/keycloak/keycloak:26.0.0")
            .withEnv("KEYCLOAK_ADMIN", "admin")
            .withEnv("KEYCLOAK_ADMIN_PASSWORD", "admin")
            .withCopyFileToContainer(
                    MountableFile.forClasspathResource("realm-export.json"),
                    "/opt/keycloak/data/import/realm-export.json"
            )
            .withCommand("start-dev", "--import-realm")
            .withExposedPorts(8080)
            .waitingFor(Wait.forHttp("/realms/webcodein-realm/.well-known/openid-configuration").forStatusCode(200))
            .withStartupTimeout(Duration.ofMinutes(3));

    @DynamicPropertySource
    static void configureKeycloakProperties(DynamicPropertyRegistry registry) {
        String authServerUrl = "http://" + keycloak.getHost() + ":" + keycloak.getMappedPort(8080);
        registry.add("spring.security.oauth2.resourceserver.jwt.issuer-uri",
                () -> authServerUrl + "/realms/webcodein-realm");
        registry.add("spring.security.oauth2.resourceserver.jwt.jwk-set-uri",
                () -> authServerUrl + "/realms/webcodein-realm/protocol/openid-connect/certs");
    }

    @LocalServerPort
    private int port;

    private final HttpClient httpClient = HttpClient.newHttpClient();

    private String getBaseUrl() {
        return "http://localhost:" + port;
    }

    @Test
    @DisplayName("End-to-End: Public endpoint returns HTTP 200 without token")
    void testPublicEndpoint() throws Exception {
        HttpRequest request = HttpRequest.newBuilder()
                .uri(URI.create(getBaseUrl() + "/api/public/hello"))
                .GET()
                .build();

        HttpResponse<String> response = httpClient.send(request, HttpResponse.BodyHandlers.ofString());
        assertThat(response.statusCode()).isEqualTo(200);
        assertThat(response.body()).contains("Hello, this is a public endpoint.");
    }

    @Test
    @DisplayName("End-to-End: Secure endpoint returns HTTP 401 Unauthorized without token")
    void testSecureEndpointWithoutToken() throws Exception {
        HttpRequest request = HttpRequest.newBuilder()
                .uri(URI.create(getBaseUrl() + "/api/secure/hello"))
                .GET()
                .build();

        HttpResponse<String> response = httpClient.send(request, HttpResponse.BodyHandlers.ofString());
        assertThat(response.statusCode()).isEqualTo(401);
    }

    @Test
    @DisplayName("End-to-End: Secure endpoint returns HTTP 200 with real Keycloak token")
    void testSecureEndpointWithKeycloakToken() throws Exception {
        String token = obtainAccessToken("regularuser", "password");

        HttpRequest request = HttpRequest.newBuilder()
                .uri(URI.create(getBaseUrl() + "/api/secure/hello"))
                .header("Authorization", "Bearer " + token)
                .GET()
                .build();

        HttpResponse<String> response = httpClient.send(request, HttpResponse.BodyHandlers.ofString());
        assertThat(response.statusCode()).isEqualTo(200);
        assertThat(response.body()).contains("Hello regularuser, you are authenticated via Zero-Trust OAuth2.");
    }

    @Test
    @DisplayName("End-to-End: Admin dashboard returns HTTP 403 Forbidden for regular user")
    void testAdminDashboardForbiddenForRegularUser() throws Exception {
        String token = obtainAccessToken("regularuser", "password");

        HttpRequest request = HttpRequest.newBuilder()
                .uri(URI.create(getBaseUrl() + "/api/admin/dashboard"))
                .header("Authorization", "Bearer " + token)
                .GET()
                .build();

        HttpResponse<String> response = httpClient.send(request, HttpResponse.BodyHandlers.ofString());
        assertThat(response.statusCode()).isEqualTo(403);
    }

    @Test
    @DisplayName("End-to-End: Admin dashboard returns HTTP 200 for user with ADMIN role")
    void testAdminDashboardAllowedForAdminUser() throws Exception {
        String token = obtainAccessToken("testuser", "password");

        HttpRequest request = HttpRequest.newBuilder()
                .uri(URI.create(getBaseUrl() + "/api/admin/dashboard"))
                .header("Authorization", "Bearer " + token)
                .GET()
                .build();

        HttpResponse<String> response = httpClient.send(request, HttpResponse.BodyHandlers.ofString());
        assertThat(response.statusCode()).isEqualTo(200);
        assertThat(response.body()).contains("Welcome to the Admin Dashboard.");
    }

    private String obtainAccessToken(String username, String password) throws Exception {
        String tokenUrl = "http://" + keycloak.getHost() + ":" + keycloak.getMappedPort(8080)
                + "/realms/webcodein-realm/protocol/openid-connect/token";

        String form = "grant_type=password"
                + "&client_id=" + URLEncoder.encode("spring-boot-client", StandardCharsets.UTF_8)
                + "&username=" + URLEncoder.encode(username, StandardCharsets.UTF_8)
                + "&password=" + URLEncoder.encode(password, StandardCharsets.UTF_8);

        HttpRequest request = HttpRequest.newBuilder()
                .uri(URI.create(tokenUrl))
                .header("Content-Type", "application/x-www-form-urlencoded")
                .POST(HttpRequest.BodyPublishers.ofString(form))
                .build();

        HttpResponse<String> response = httpClient.send(request, HttpResponse.BodyHandlers.ofString());
        assertThat(response.statusCode()).isEqualTo(200);

        String json = response.body();
        int start = json.indexOf("\"access_token\":\"");
        if (start != -1) {
            int tokenStart = start + 16;
            int end = json.indexOf("\"", tokenStart);
            return json.substring(tokenStart, end);
        }
        throw new IllegalStateException("access_token not found in response: " + json);
    }
}
To learn how to streamline your local development environment using Docker Compose and Testcontainers, read Modern Local Development with Testcontainers and Docker Compose in Spring Boot 4.
8. Comparative Analysis: Keycloak vs. Cloud Providers
Architects must select identity solutions based on hosting requirements, budget constraints, compliance standards, and operational maturity. Table 1 compares Keycloak against popular cloud identity services:
| Architecture Dimension | Keycloak (Self-Hosted) | Auth0 (Okta) | AWS Cognito | Spring Authorization Server |
|---|---|---|---|---|
| Hosting Model | On-premises, Kubernetes, VM, or Docker | Fully managed multi-tenant SaaS | Fully managed AWS cloud service | Embedded inside Spring Boot JVM |
| License & Cost | Open Source (Apache 2.0); infrastructure cost only | Proprietary SaaS; monthly active users (MAU) pricing | AWS usage pricing; free tier then per-MAU charge | Open Source (Apache 2.0); JVM compute cost only |
| Data Sovereignty & Privacy | Total control; air-gapped support; GDPR / HIPAA compliant | Vendor hosted; subject to third-party data compliance | Restricted to chosen AWS availability regions | Total control; uses your relational database |
| Custom Extensibility | High; Java SPI plugins (authenticators, event listeners) | Medium; JavaScript/TypeScript Auth0 Actions | Medium; AWS Lambda triggers | Very high; custom Spring Beans and converters |
| Administrative UI | Comprehensive out-of-the-box web admin console | Polished, feature-rich web dashboard | Basic AWS Management Console | None; requires building custom admin pages |
| Operational Complexity | Moderate to High; requires clustering, DB, backups | Zero; managed by vendor SLA | Low; managed by AWS infrastructure | Moderate; maintained as part of application code |
Keycloak excels when data sovereignty, on-premises isolation, or enterprise compliance requires hosting identity data inside private networks. Cloud SaaS providers like Auth0 reduce operational burdens, but costs scale rapidly as monthly active users increase.
9. Real-World Enterprise Use Cases
Zero-Trust security models solve specific challenges across diverse enterprise industries. Below are three production scenarios where Keycloak and Spring Boot 4 provide robust protection.
Use Case 1: Financial Banking & Fintech Core Banking APIs
In financial banking platforms, core banking microservices process payment transfers, loan applications, and ledger updates. Perimeter networks offer insufficient protection against insider threats or compromised internal services. By implementing Zero-Trust OAuth2 with Keycloak:
- Every transaction requires a cryptographically signed JWT with short expiration windows (e.g., 5 minutes).
- Step-up authentication is triggered when users initiate high-value wire transfers, prompting for Time-based One-Time Passwords (TOTP).
- Spring Security extracts the authenticated user ID and audit claims, ensuring that immutable financial audit logs capture user identity across all downstream ledger services.
Use Case 2: Healthcare Portals & HIPAA Compliance
Healthcare providers manage Electronic Health Records (EHR) governed by strict privacy regulations such as HIPAA and GDPR. Patient data must never remain accessible across unauthenticated network boundaries. With Keycloak and Spring Boot:
- Doctors, nurses, and administrative staff receive role assignments within a dedicated hospital realm.
- Spring Security filters enforce role boundaries: nurses access patient vitals, while only licensed physicians access prescription ordering endpoints.
- Multi-tenant realms separate multiple hospital branches while allowing cross-realm trust federation when transferring patients between medical centers.
Use Case 3: Distributed IoT Fleet & Edge Device Telemetry
Modern industrial systems collect telemetry from thousands of smart energy meters and IoT gateways. Traditional username/password schemes expose systems to credential stuffing and device spoofing. With OAuth2:
- Edge devices authenticate using the Client Credentials Grant, presenting asymmetric mTLS certificates to Keycloak to obtain short-lived scoped tokens.
- The Spring Boot ingestion server validates the JWT signatures at high throughput using cached JWKS public keys without contacting Keycloak on every ingest packet.
- If a physical meter is tampered with, administrators revoke the client credential in Keycloak, instantly locking the compromised device out of the ingestion pipeline.
10. Production Hardening & Security Best Practices
Deploying a Zero-Trust resource server into production requires following specific hardening rules:
- Implement In-Memory JWKS Caching: Spring Security automatically caches public keys retrieved from the
jwk-set-uri. Ensure your network settings allow Spring Boot to refresh certificates when Keycloak rotates keys, while caching keys in memory to keep API latency under 2 milliseconds. - Keep Token Lifespans Short: Configure access tokens to expire within 5 to 15 minutes. Use refresh token rotation with Keycloak’s Revocation Policies to guarantee that stolen access tokens become useless quickly.
- Enforce Mutual TLS (mTLS): Combine application-layer JWT verification with transport-layer mTLS. This prevents Man-in-the-Middle (MitM) attacks between service mesh proxies.
- Strip Authorization Headers at Ingress: Configure your API Gateway (such as Spring Cloud Gateway or Envoy) to strip incoming client
Authorizationheaders on public routes to prevent header-smuggling attacks. - Enable Rate Limiting & Brute Force Detection: Turn on Keycloak’s built-in Brute Force Detection feature to automatically lock user accounts after consecutive failed login attempts.
11. Common Pitfalls and Troubleshooting
Developers encountering OAuth2 and Keycloak integration issues often face three common pitfalls. Review these failure modes and their verified remediations:
Pitfall 1: Issuer URL Mismatch in Containerized Deployments
Symptom: Spring Security throws JwtValidationException: The iss claim is not valid and rejects all incoming requests with HTTP 401.
Root Cause: When running Keycloak inside Docker, the frontend or test runner accesses Keycloak via http://localhost:8080, but internal container networks reference http://keycloak:8080. Keycloak stamps the token issuer claim (iss) based on the URL where it received the token request. If Spring Boot’s configured issuer-uri does not match the exact character string in the token’s iss claim, validation fails.
Remediation: In production, configure Keycloak’s KC_HOSTNAME environment variable with your public domain (e.g., https://auth.company.com). In development environments, guarantee that both your client token requests and Spring Boot properties use the exact same host and port (e.g., http://localhost:8080/realms/webcodein-realm).
Pitfall 2: Missing “ROLE_” Prefix in Custom Converters
Symptom: The user possesses the ADMIN role in Keycloak, but calling /api/admin/dashboard returns HTTP 403 Forbidden.
Root Cause: Spring Security’s hasRole("ADMIN") method automatically looks for a GrantedAuthority named ROLE_ADMIN. If your custom converter extracts the raw string ADMIN from Keycloak without prepending ROLE_, the authorization filter will reject the request.
Remediation: In your KeycloakGrantedAuthoritiesConverter, always prepend ROLE_ when instantiating authorities: new SimpleGrantedAuthority("ROLE_" + role).
Pitfall 3: Account Is Not Fully Set Up on Direct Access Grants
Symptom: Requesting tokens via grant_type=password returns HTTP 400 with {"error":"invalid_grant","error_description":"Account is not fully set up"}.
Root Cause: Keycloak 26 requires imported test users to have verified email status and empty required actions. If "emailVerified": true or "requiredActions": [] are omitted from realm-export.json, Keycloak blocks direct password token issuance until the user logs into the web console to complete profile setup.
Remediation: Ensure your imported user JSON explicitly sets "emailVerified": true and "requiredActions": [] as demonstrated in Section 3.
12. Technical FAQ, Companion Code & References
Frequently Asked Questions
What is the difference between OAuth 2.0 and OpenID Connect (OIDC)?
OAuth 2.0 is an authorization framework designed to grant third-party applications delegated access to resources without sharing user passwords. OpenID Connect (OIDC) is an identity layer built directly on top of OAuth 2.0. OAuth 2.0 returns an Access Token intended for the Resource Server, whereas OIDC provides an ID Token containing user profile attributes (such as name, email, and subject ID) intended for the client application.
Why should microservices validate JWT signatures locally instead of calling Keycloak on every request?
Calling Keycloak’s token introspection endpoint (/protocol/openid-connect/token/introspect) on every microservice request introduces significant network latency and turns the identity provider into a centralized bottleneck. Using JSON Web Signatures (JWS) with asymmetric RSA keys allows resource servers to cache Keycloak’s public keys locally and verify tokens using fast in-memory cryptography in sub-millisecond time.
How can I handle instant token revocation if JWTs are stateless?
Stateless JWTs remain valid until their expiration timestamp (exp). To revoke access immediately before expiration (e.g., when an employee is terminated), enterprises use two strategies: configure short token lifespans (5 minutes or less) combined with refresh tokens, or implement a distributed blacklist cache (such as Redis) where revoked token IDs (jti) are checked during high-security transactions.
Can Spring Boot 4 support both multi-tenant realms and dynamic issuers?
Yes. Spring Security 7 provides the JwtIssuerAuthenticationManagerResolver class. This resolver dynamically checks the iss claim on incoming tokens and routes validation to different Keycloak realms or third-party providers based on tenant identifiers.
Companion Workshop Code
The companion codebase for this guide is available on GitHub. It includes the complete Spring Boot 4 application, Keycloak Docker Compose configuration, automated realm export scripts, and the full Testcontainers test suite:
👉 View the Companion Workshop Code on GitHub